Getting started with Cygon
Everything you need to go from installation to your first exported environment. No prior 3D experience required.
Getting Started
Everything you need to install Cygon, learn what it does, and build your very first environment.
Get Started
Learn the fundamentals of Cygon and discover how to efficiently configure, optimize, and integrate our 3D tools into your production pipeline.
Prerequisites
Before installing CYGON, ensure your system meets the following requirements:
- Operating System: Windows (only tested on 11) / MacOs (only tested on Sonoma)
- Processor: Intel Core i5 or equivalent
- Memory: 8 GB RAM minimum (16 GB recommended)
- Graphics: Dedicated GPU with at least 2 GB VRAM
- Storage: 5 GB available space
To use Cygon, you need an active InspyrStudio account. This account manages your license and enables project exports.
You can enjoy Cygon for free! Just a heads-up: project exporting is a premium feature reserved for licensed users.
- Already have an account? Sign in here.
- New user? Create your account here.
Install the Cygon Launcher
The launcher handles the application and ensures you have the latest updates.
Download the Cygon Launcher here.
Need more details? For installation requirements or troubleshooting, check out our Cygon Launcher Documentation.
Launch and Activate
Once installed, you are ready to open the engine.
Open Cygon: Launch the application from your desktop.
Sign In: Enter your InspyrStudio credentials to authenticate your session.
Start Designing: Once logged in, you’ll be taken directly to the Project Hub. You’re all set to start your first level!
More on Cygon
Unleash your workflow with Cygon, our brand new 3D powerhouse.
What is Cygon ?
CYGON is a cutting-edge 3D environment creation software designed to revolutionize the way digital worlds are built. With CYGON, unleash your creativity, overcome technical barriers, and bring your imagination to life. Our software is tailored to accelerate the creation process, making it easier and faster to design immersive and detailed virtual environments.
Who is it Designed for?
CYGON is primarily crafted for video game creators, providing them with the essential tools to efficiently build expansive and intricate game worlds. Whether you are an independent developer or part of a larger studio, CYGON empowers you to focus on creativity and storytelling without being hindered by technical complexities.
Additionally, CYGON is also intended for professionals in VFX and movie animation, as well as many other fields that require robust 3D environment design capabilities. Our versatile software ensures that creators from various industries can bring their unique visions to life with ease and precision.
Project Stage
CYGON has been under development for two years by a dedicated team of two. We are approaching our first major release, but currently, the software is available through an Insider Program. This program allows early adopters to test the software, provide feedback, and help shape the future of CYGON.
Recently, CYGON has taken a strategic turn to focus more intensely on the prototyping phase of video game creation. This shift allows us to refine and enhance the tools most critical for game developers during the initial stages of game design, ensuring a solid foundation for building captivating virtual worlds.
Join us on this exciting journey and be part of the revolution in 3D environment creation. Stay tuned for updates and become an insider to experience the future of digital design with CYGON!
Keyboard shortcuts
Speed up your workflow with Cygon's full keyboard shortcut system.
Speed up your workflow with Cygon's keyboard shortcuts. The faster you can switch tools, the more time you spend building and the less time you spend navigating menus.
Note for macOS
On macOS, replace Ctrl with Cmd for all shortcuts listed with Ctrl.
Building tools
- Ctrl + Num 1 : Create a wall
- Ctrl + Num 2 : Create an opening
- Ctrl + Num 3 : Create a floor object
- Ctrl + Num 4 : Create a stair
Navigation & modes
- V : Open / close the view mode pie menu
- Shift + Num 1 : Normal view mode
- Shift + Num 2 : Link Editor view mode
- Shift + Num 3 : FPS / walk mode
- F : Focus on the selected object
Floor management
- U : Move up one floor
- J : Move down one floor
- Scroll (mouse wheel) : Scroll on the height ladder
- Ctrl + Scroll : Zoom on the height ladder
Editing
- Ctrl + C : Copy entity
- Ctrl + V : Paste entity
- Ctrl + D : Duplicate entity
- Ctrl + Shift + D : Duplicate attributes
- Ctrl + Shift + V : Paste attributes
- Ctrl + Z : Undo
- Ctrl + Y : Redo
- Ctrl + Shift + Z : Redo (alternative)
Tools & interface
- Tab : Open / close the tool pie menu
- Ctrl (hold) : Toggle snapping on / off
- Ctrl + S : Quick export
- Escape : Cancel / deselect / exit FPS / stop drag
Movements
- ↑ Z , ↓ S , ← Q , D → : Move around in the scene
- A / E : Go up and down
- MMB (middle mouse button) : Move around on the 2D axis
- Alt + MMB : Rotate around
Workspace & User Interface
Get familiar with the Cygon editor — the project manager, the interface, and the 3D gizmos you'll use every day.
Manage Your Project
The Project Manager serves as the central hub for managing your Cygon Studio projects. It allows you to organize, open, and export your work seamlessly.
Project Manager Guide
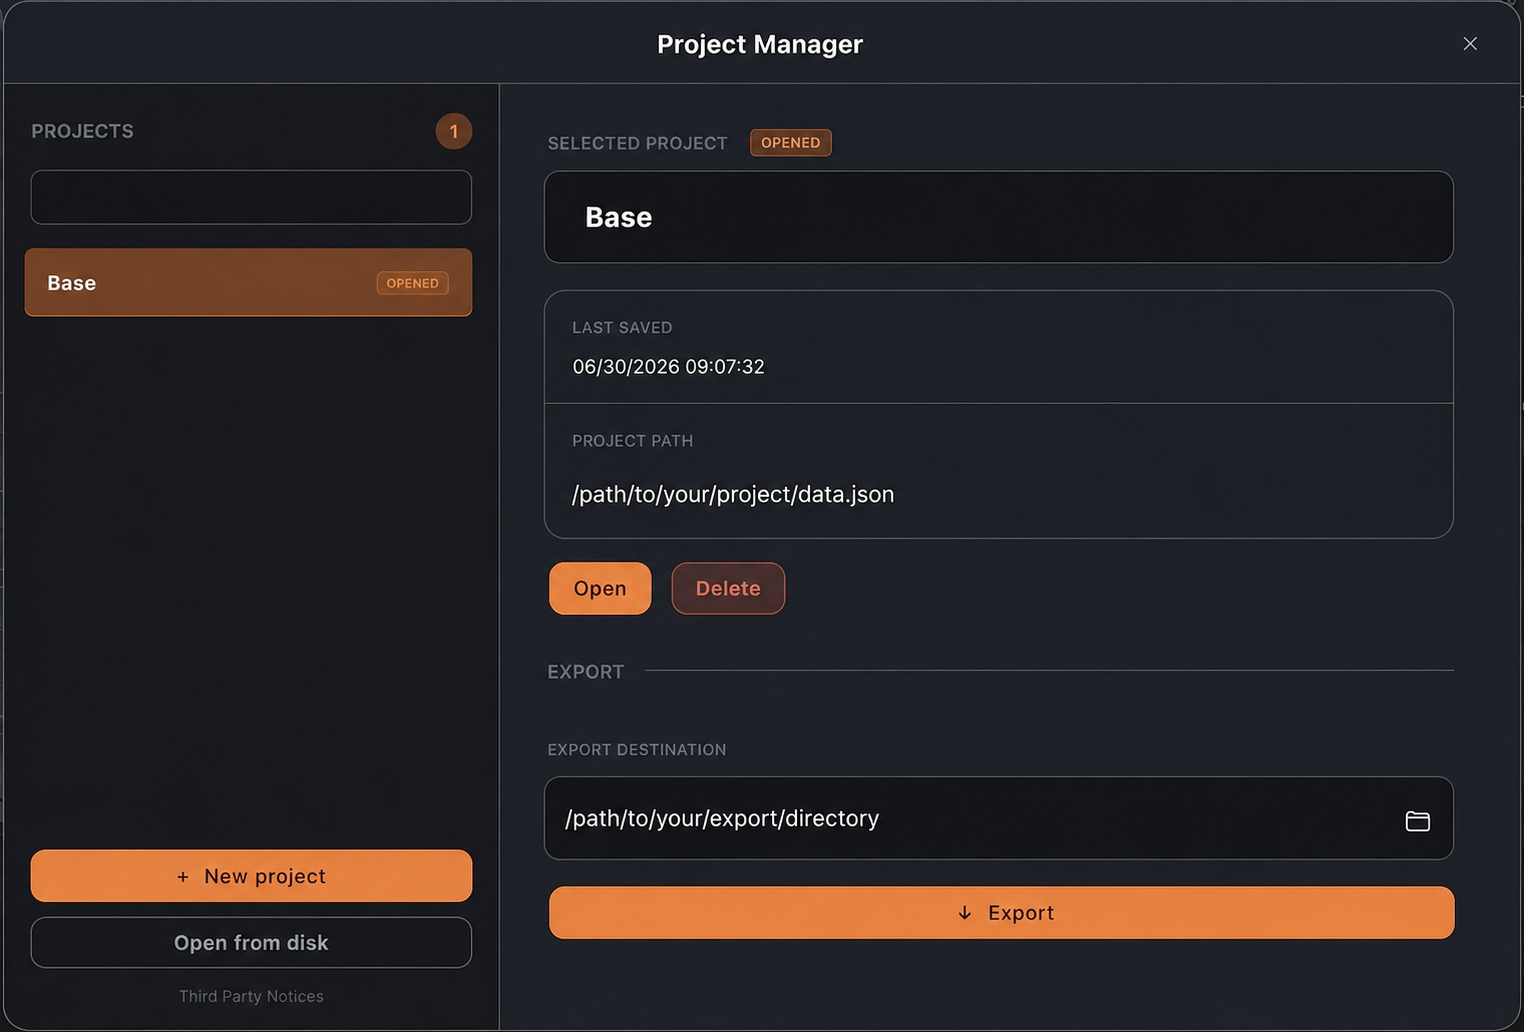
Project List & Navigation
- Overview: Your saved projects are displayed in the sidebar on the left, showing their current status (e.g., "OPEN") and last modified timestamps.
- Quick Search: Use the search bar at the top of the sidebar to quickly locate a specific project by name.
- New Projects: Create a new project by clicking the "+ New Project" button at the bottom of the sidebar.
Project Details
When a project is selected, the main panel displays:
- Project Metadata: The name of the selected project, its last saved date and time, and its local directory path.
- Management Actions: Buttons to Open the selected project or Delete it from your list.
Exportation
- Action: Click the "Exporter" button to initiate the transfer.
(CygonLink Documentation here)
Interface
Get familiar with the Cygon workspace layout, toolbars, and panel functions designed to maximize your efficiency and accelerate your 3D optimization tasks.
Welcome to the Cygon interface guide. This document provides a comprehensive overview of the editor's user interface, core components, and interaction models designed for high-performance FPS map metrics and level layout.
Main Workspace Breakdown
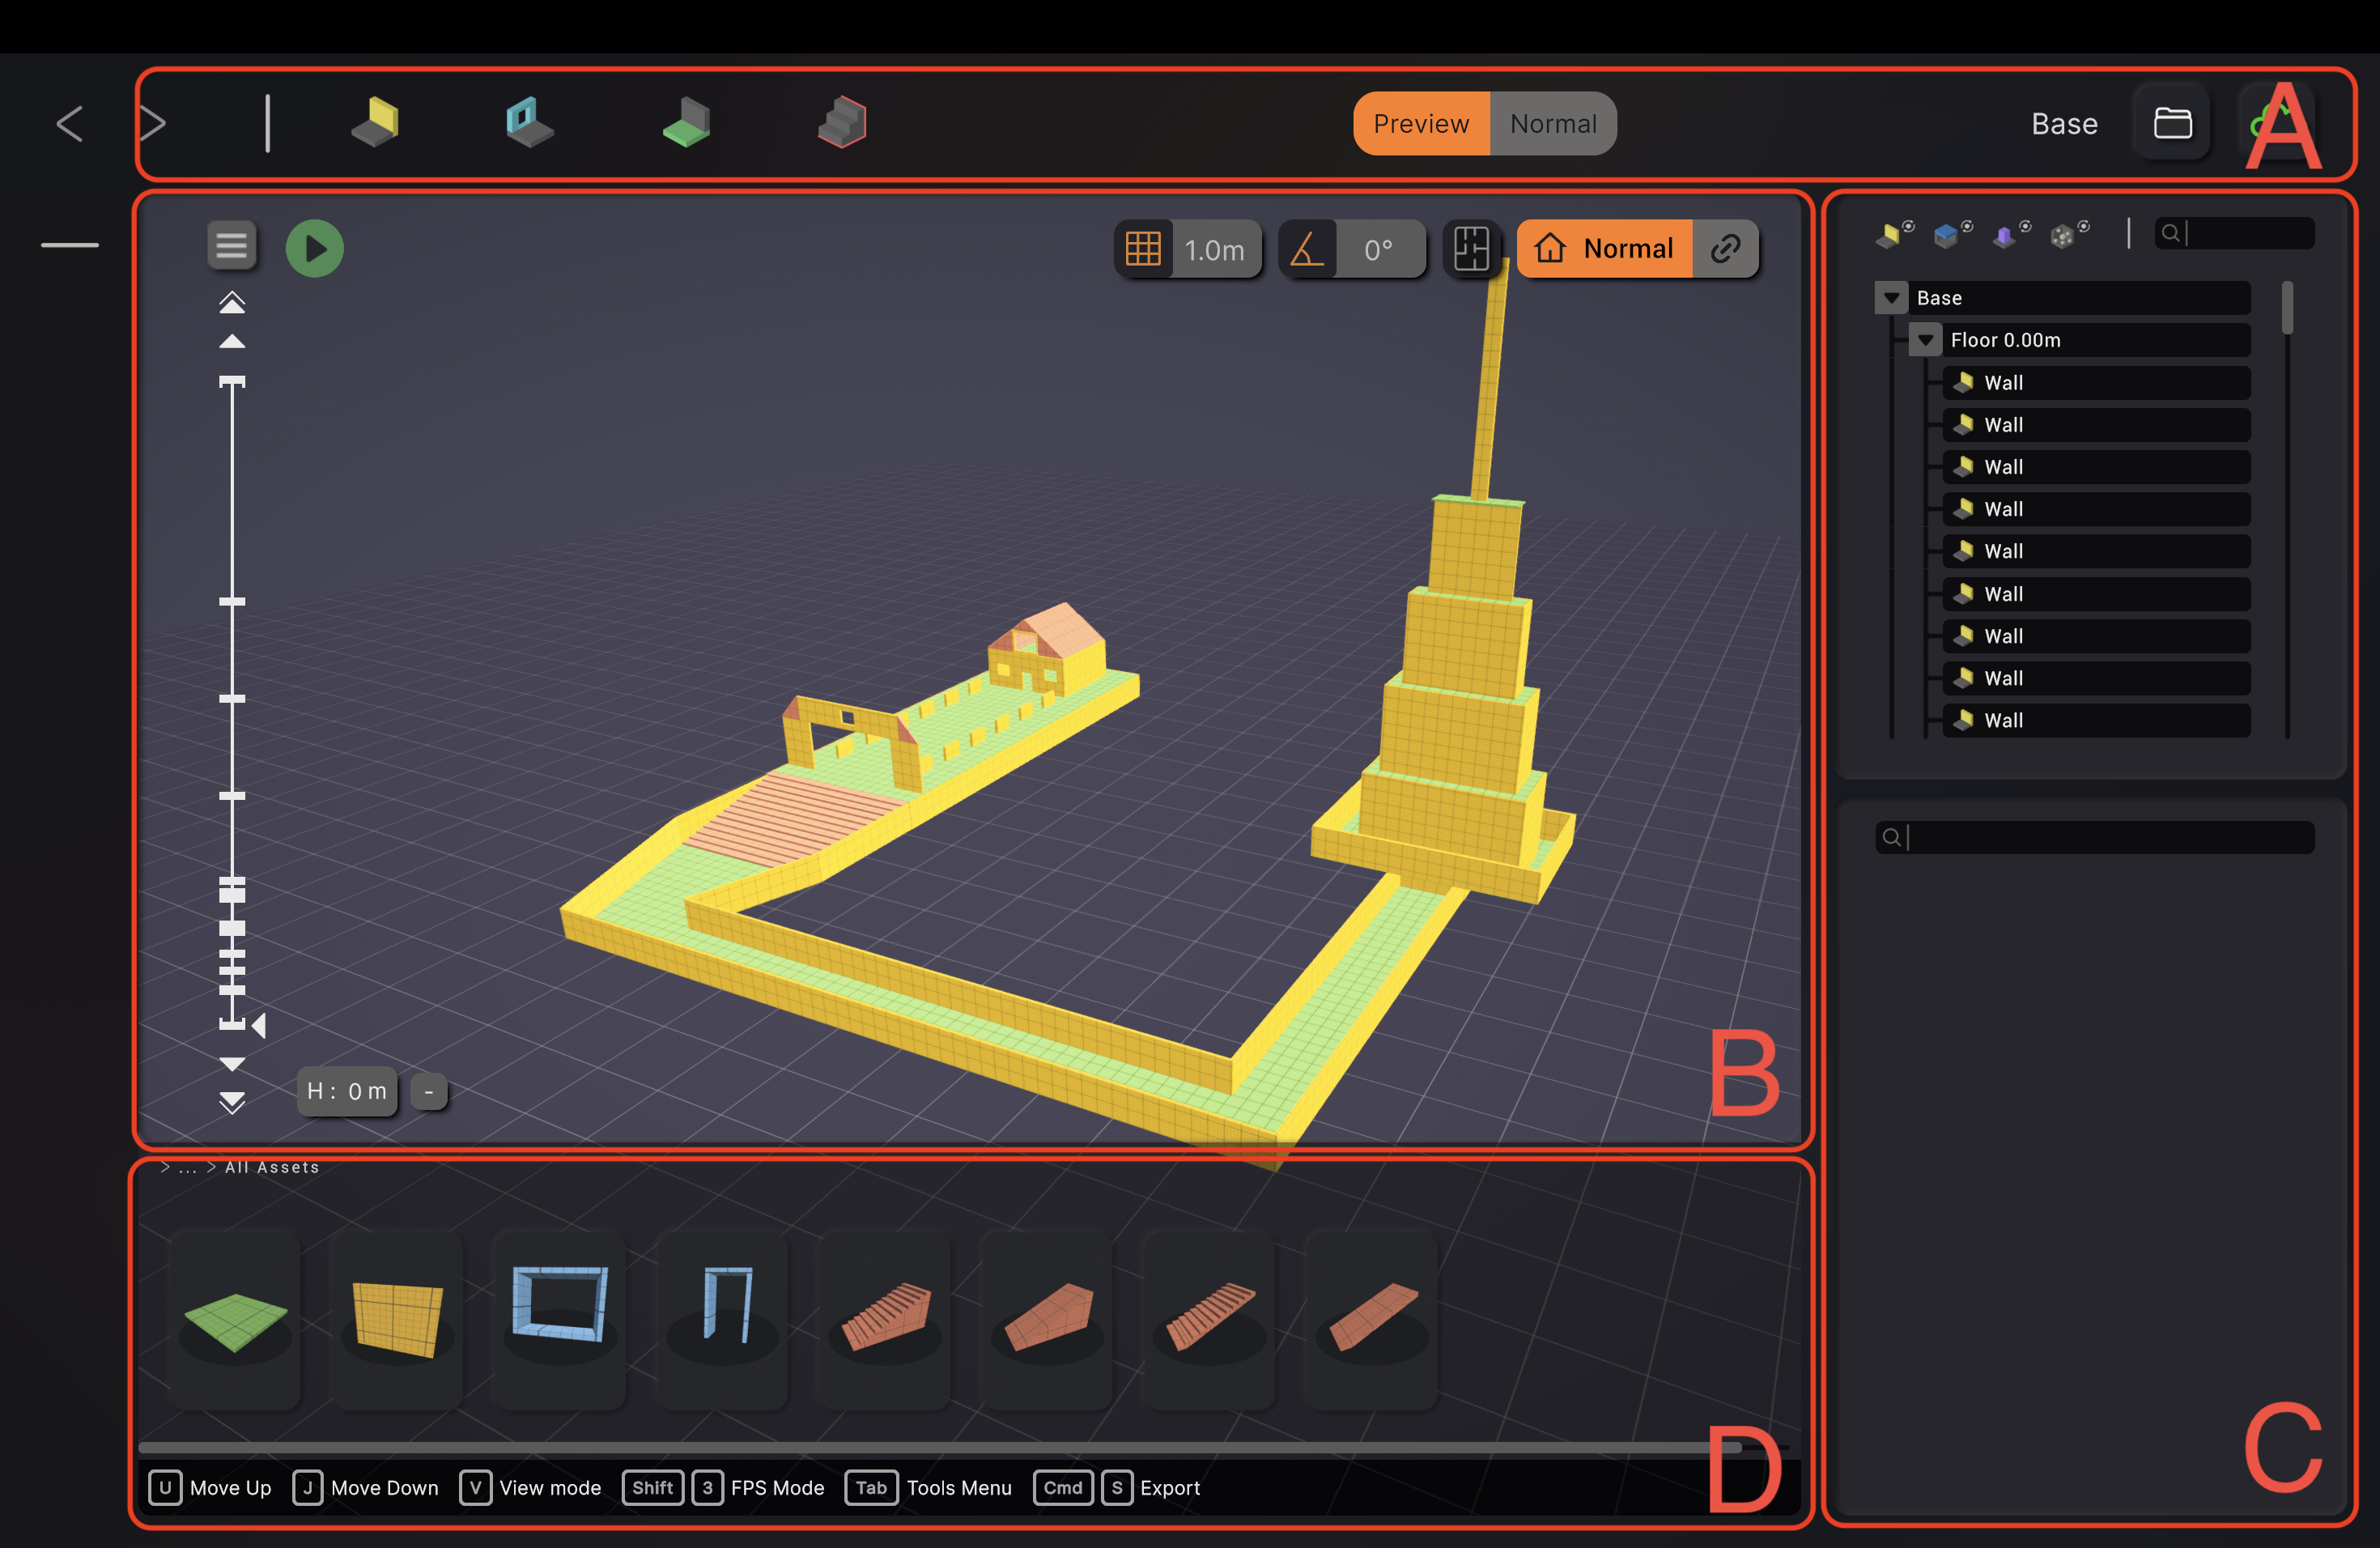
The Cygon editor is divided into four main functional areas designed to optimize your level design workflow:
A. Top Control Bar
Located at the very top of the application, this bar houses global project operations and quick-access toggles:
- Navigation & File Management: Includes undo/redo arrows (< >), the current level name (NewLevel), and a folder icon for project management.
- Tool Mode Selector: Quick icons to switch between building block categories (Floors, Walls, Openings, Stairs).
B. The Viewport (3D Canvas)
The central zone where you build and analyze your map metrics:
- Active Floor Grid: Features a dynamic green grid overlay representing the current editing plane.
- Height Manager (Left Side): A vertical axis widget that allows precision height adjustment (H: 0m) to navigate through multi-story layouts.
- Contextual Overlays: Floating action buttons for viewport settings, including grid sizing (e.g., 1.0m) and angle grid sizing (e.g., 0°).
C. Right-Side Panels
Hierarchy / Scene Tree (Top Right): Displays the structural layout of your level (e.g., Floor 0.00m containing individual Wall entities) with visibility and locking toggles.
Asset / Inspector Panel (Bottom Right): Dedicated area for searching and tweaking properties or filtering contextual items via a dedicated search bar.
D. Bottom Asset Shelf & Shortcuts
Asset Carousel: Quick-access tray hosting block archetypes (floors, walls, pillars, window frames, door frames, and various stair inclinations).
Hotkey Status Bar: Live status indicators displaying vital editing shortcuts:
- U Move Up | J Move Down | V View mode | Shift + 3 FPS Mode | Tab Tools Menu
Hierarchy Naviguation Guide
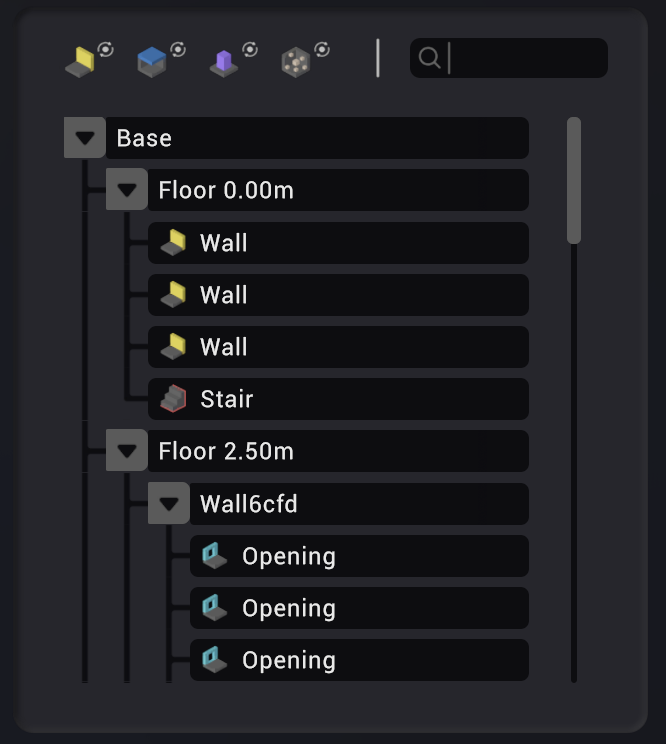
Bidirectional Sync:
- To Scene: Clicking any element in the hierarchy instantly selects the corresponding object in your 3D workspace.
- To Hierarchy: Selecting an object (like a wall) directly in the viewport will automatically highlight the associated item in the hierarchy, making it a breeze to find your way around complex projects as shown in image_cfe7e1.png.
Tree Structure Visualization:
- Elements are organized in a parent/child structure (e.g., NewLevel > Floor > Wall1).
- Use the drop-down arrows (▼) to expand or collapse groups for a cleaner workspace.
Quick Search:
- Use the search bar at the top to filter through your elements and find exactly what you need without getting lost in the weeds.
Advanced Selection & Interaction
When manipulating geometry in the viewport, precision handling is key for accurate blockout metrics.
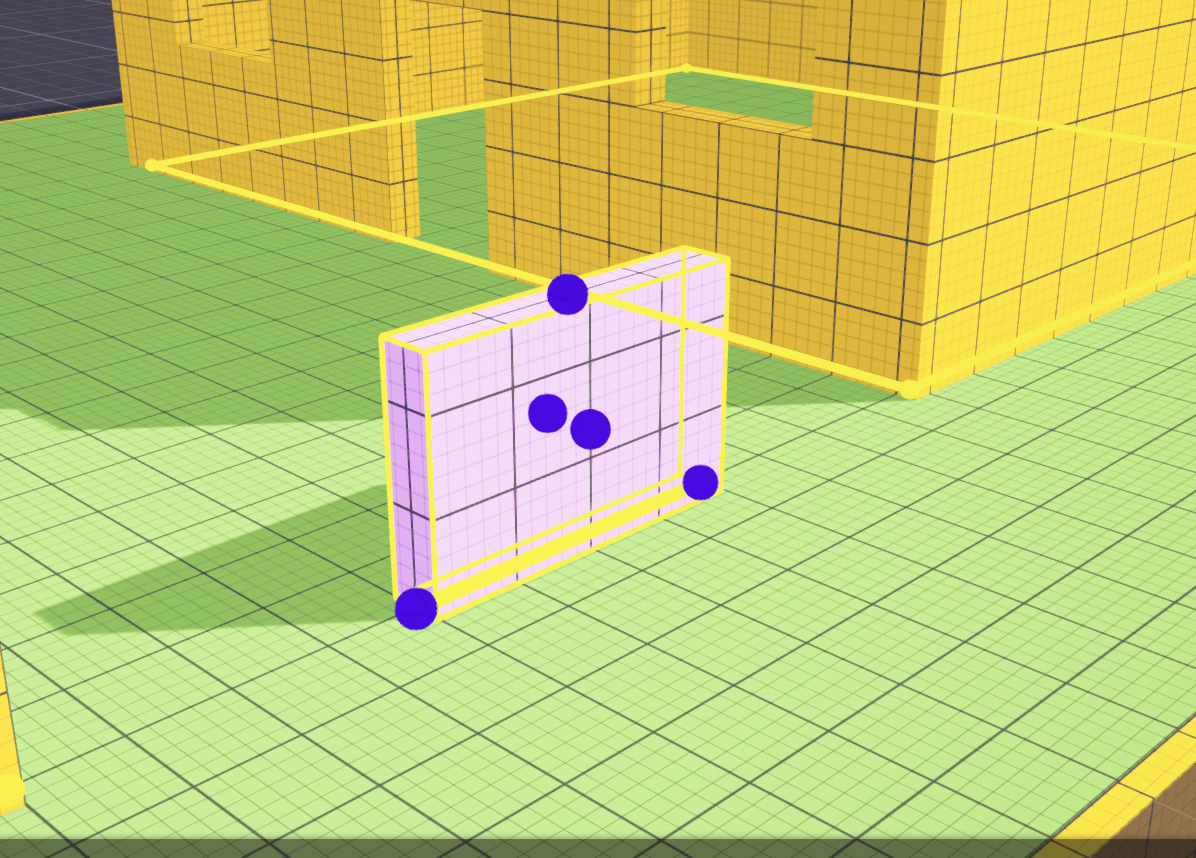
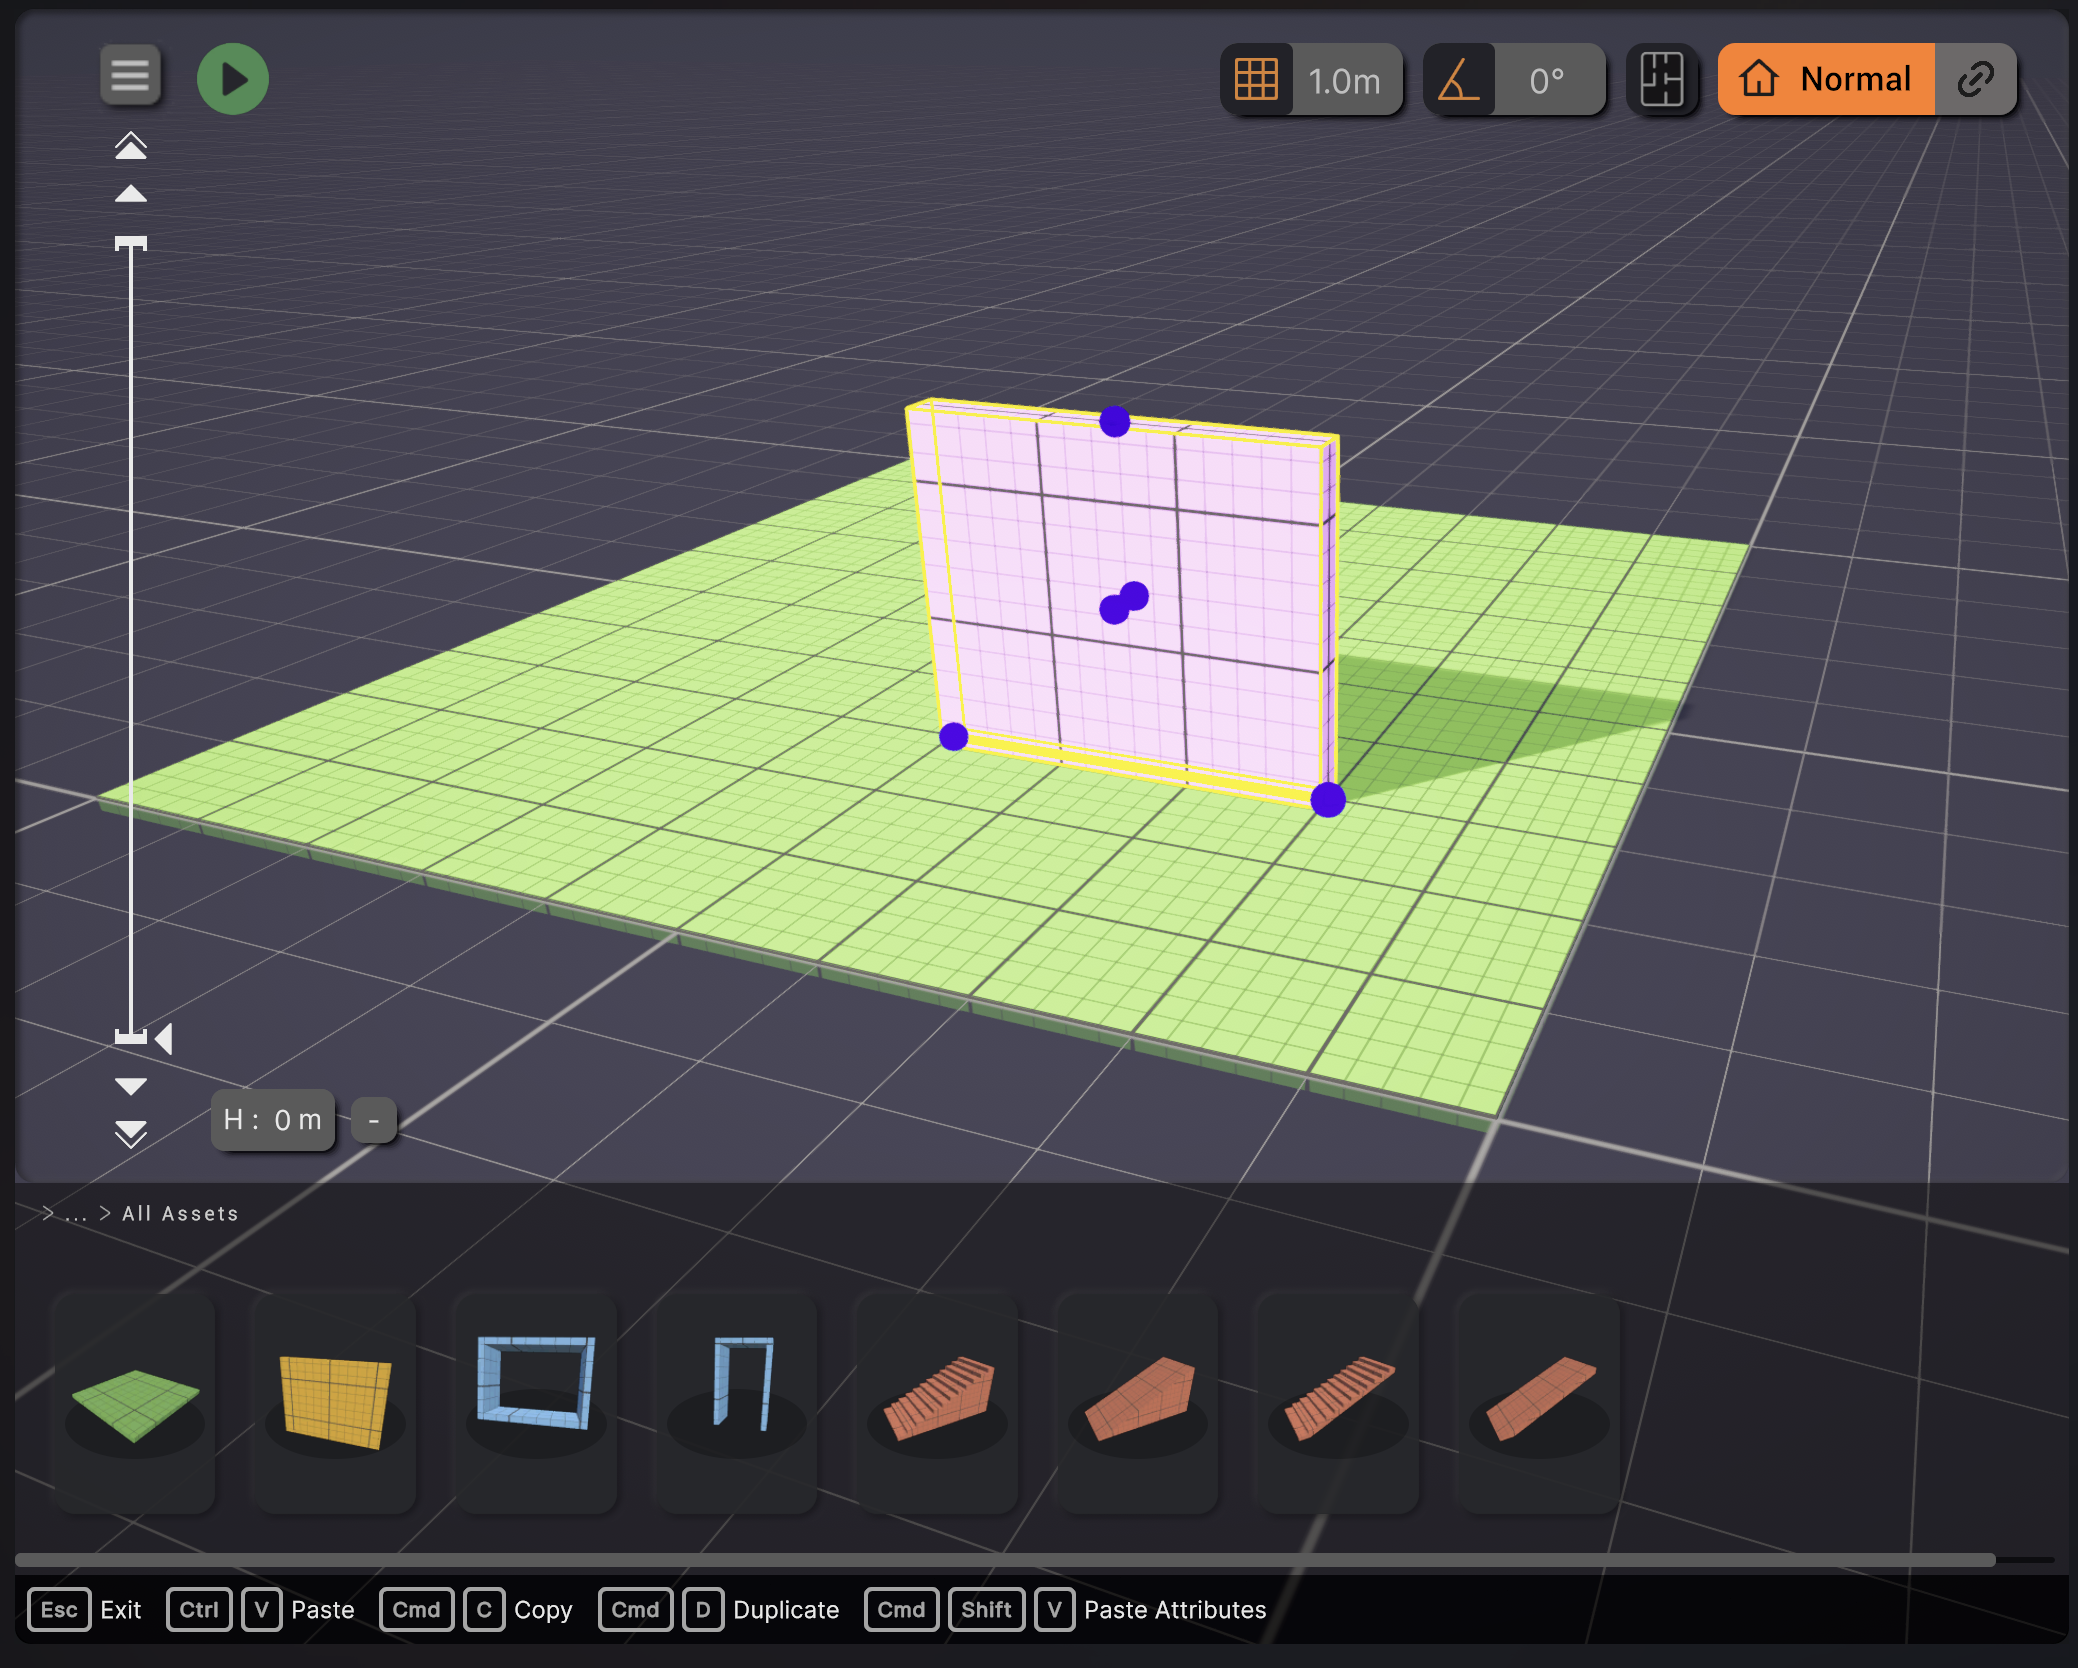
- Active Selection Mesh: Selected geometry features a distinct pink tint with a yellow bounding outline to highlight it in 3D space.
- Interactive Handles: Purple spherical gizmos appear on the vertices and faces of the active block, allowing for precise directional scaling and vertex manipulation.
- Alignment Guides: Yellow base indicators project onto the floor grid to assist with wall snapping, orientation tracking, and parallel alignment against other blocks.
Contextual UI Elements
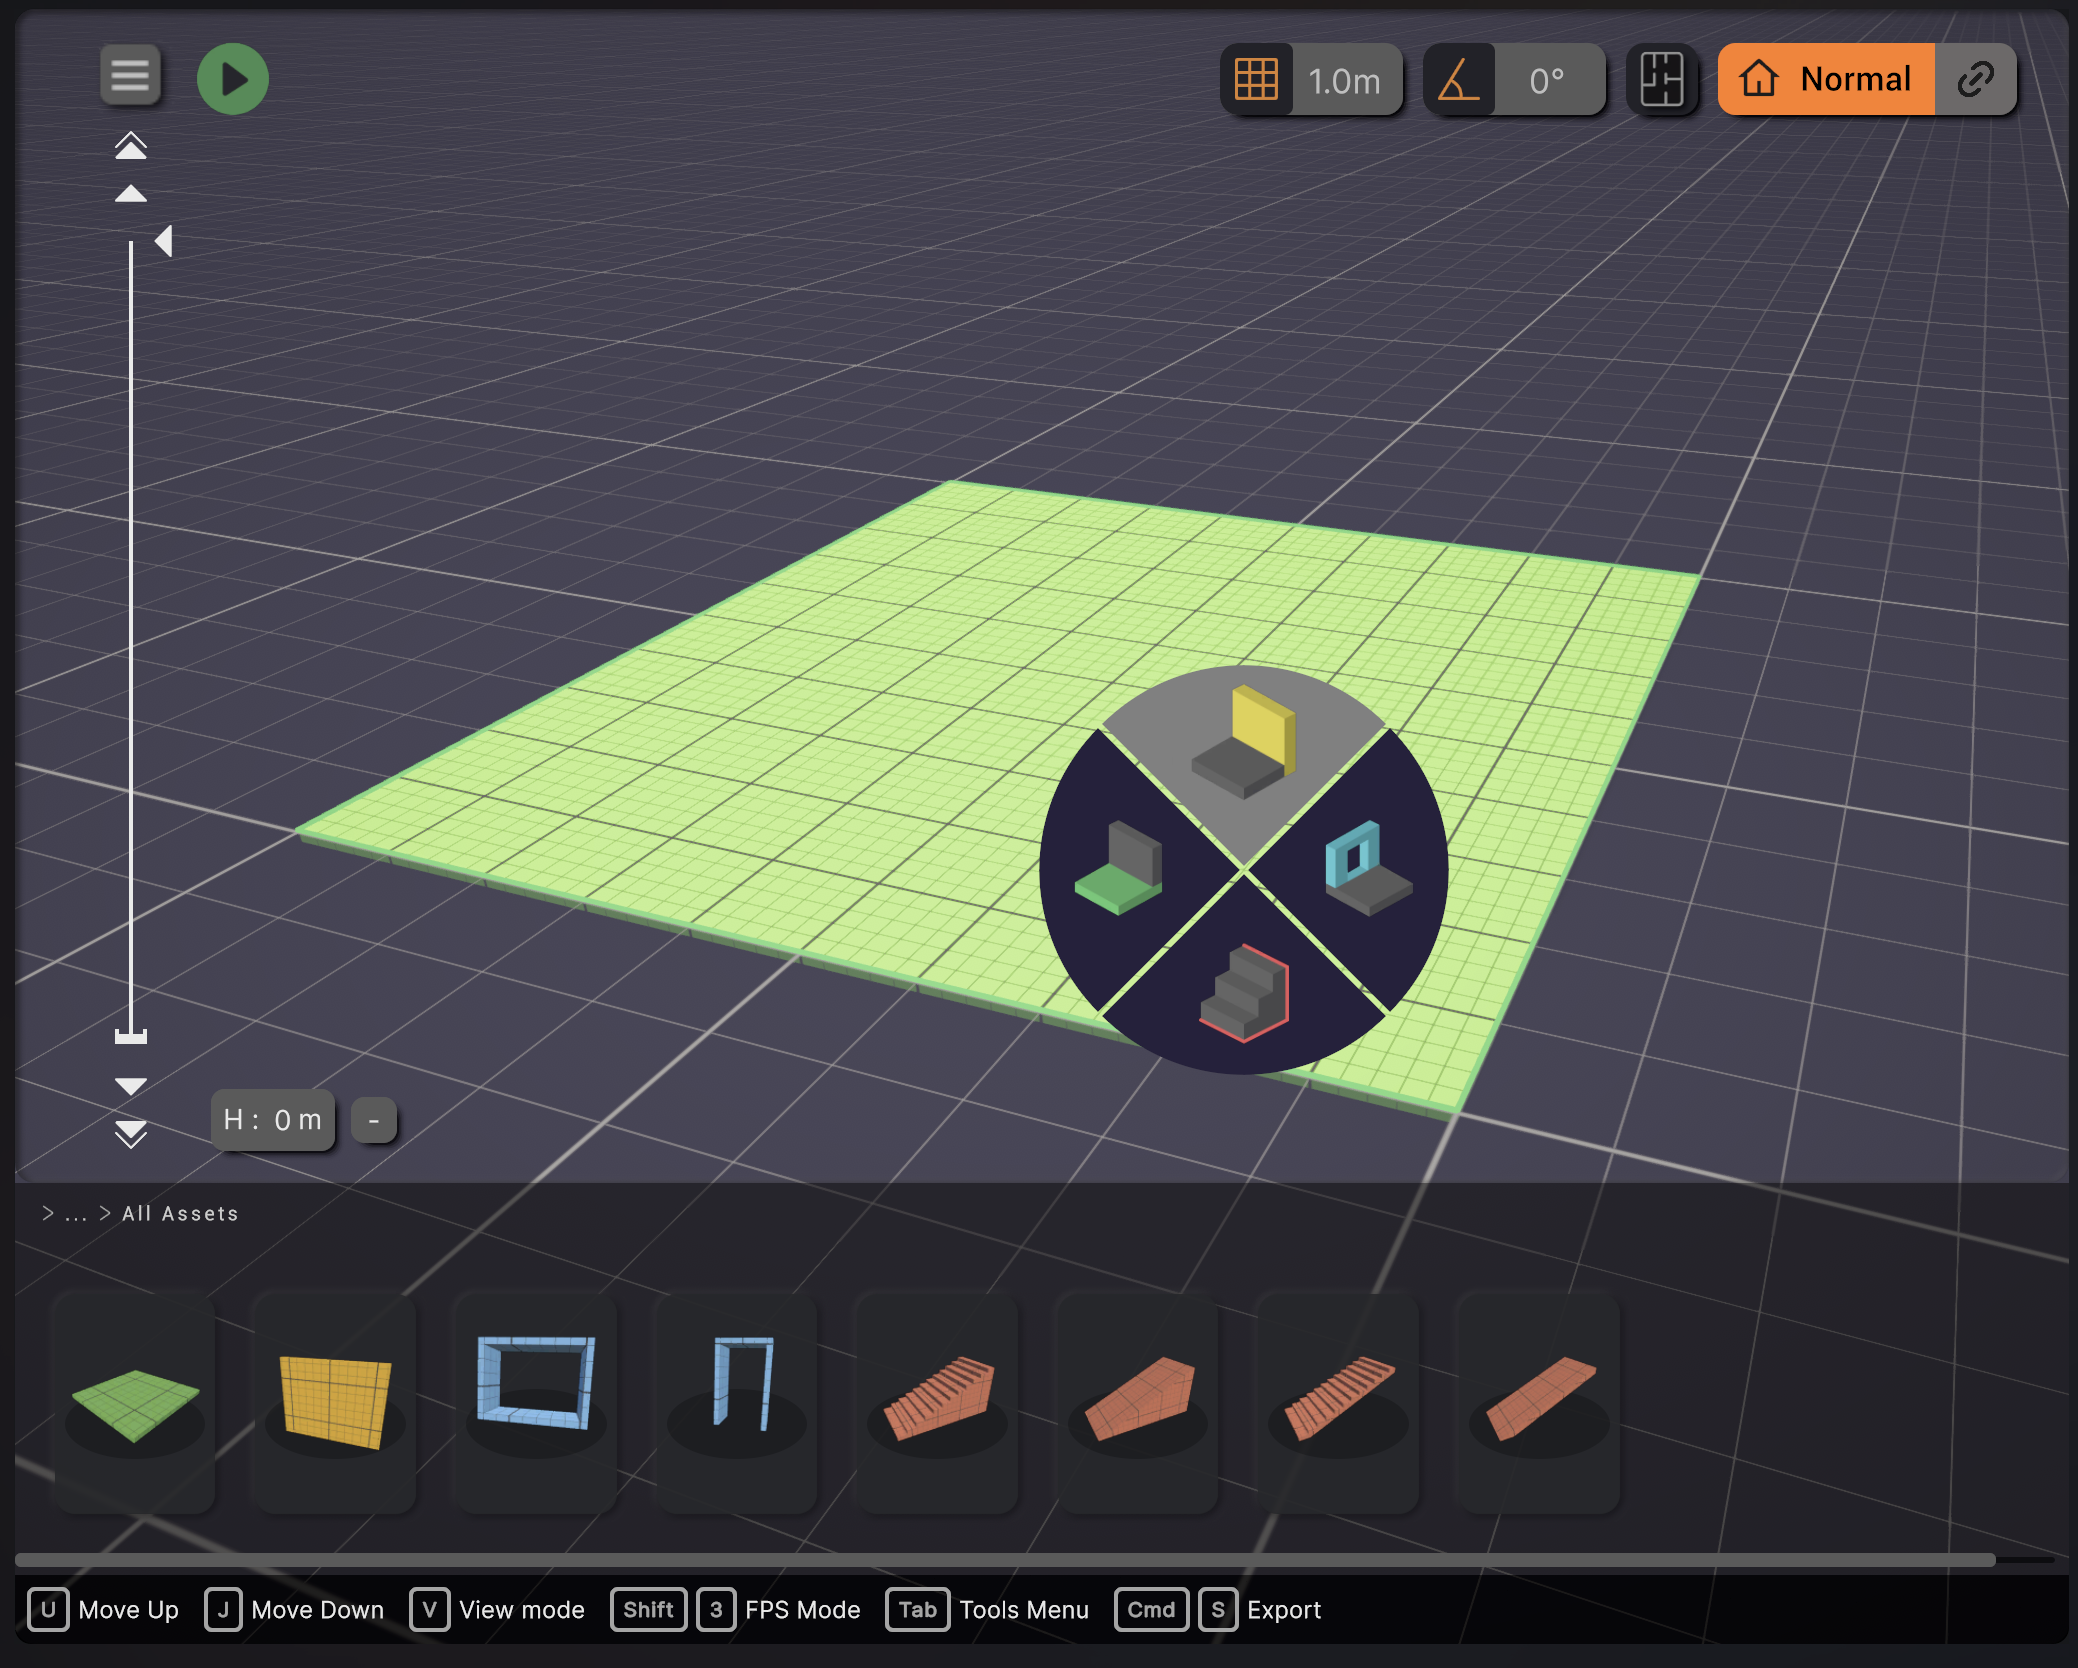
Tools Pie Menu
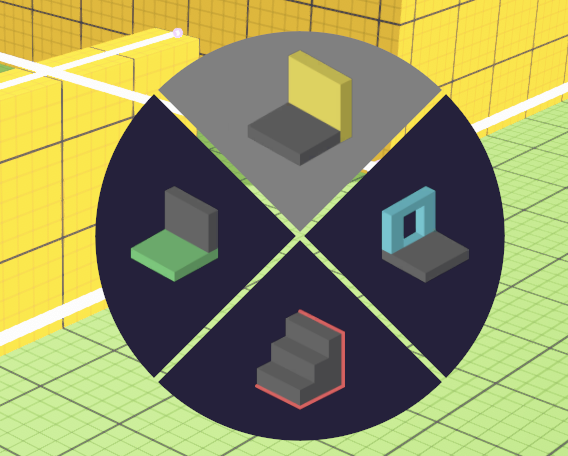
To keep the viewport clean and speed up asset deployment, pressing Tab opens the contextual radial menu. This wheel allows rapid switching between core construction archetypes:
- North: Wall placement mode (Yellow)
- East: Structural openings/frames (Blue)
- South: Staircase geometry (Red)
- West: Floor plate generation (Green)
3D Gizmo
To manipulate geometry with absolute precision and maintain consistent map metrics, Cygon utilizes a dynamic 3D Gizmo combined with contextual alignment overlays.
Bounding Box Anatomy & Handles
Selecting a structural block triggers a multi-layered visual feedback system:
- Selection Highlight: The entire targeted block is washed with a translucent pink tint to immediately isolate it from adjacent elements.
- Bounding Frame: A high-visibility yellow outer wireframe wraps around the absolute boundaries of the mesh, defining its precise geometric volume.
- Interactive Handles (Gizmos): Bright purple spherical nodes generate contextually at the vertices and face centers of the selected object. These serve as the physical grab points for translation (moving) and non-uniform scaling (stretching/resizing) operations.
Spatial Alignment Guides
To assist with tracking across long sightlines, the 3D Gizmo projects a solid yellow orientation line along the base of the selected element. This line maps directly onto the active horizontal grid, allowing designers to visually align flush wall corridors or verify parallel alignments across the level without shifting camera angles.
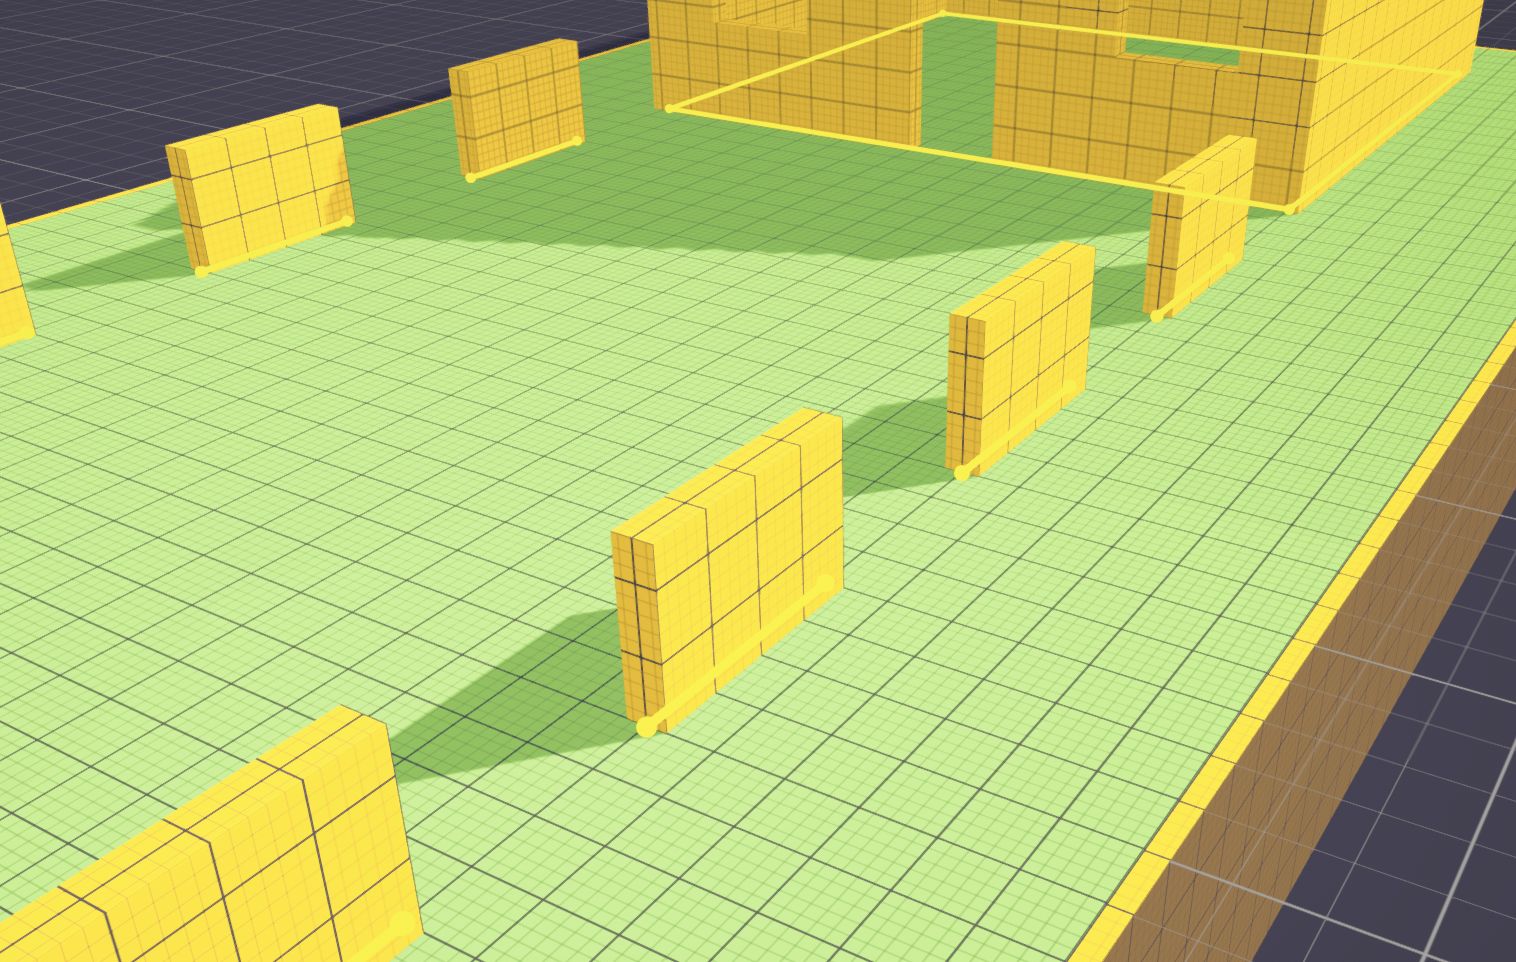
Gizmo Visibility Modes
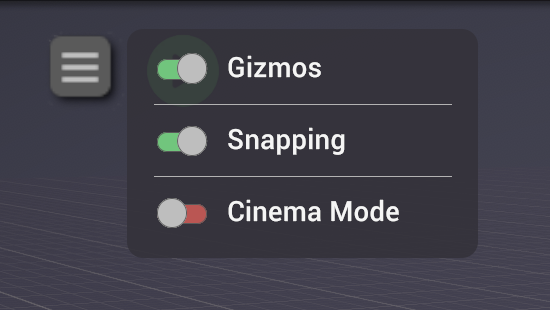
Expanding the menu icon in the upper-left corner of the viewport exposes the contextual options menu. The Gizmos toggle allows users to strip away design noise on the fly depending on the current task:
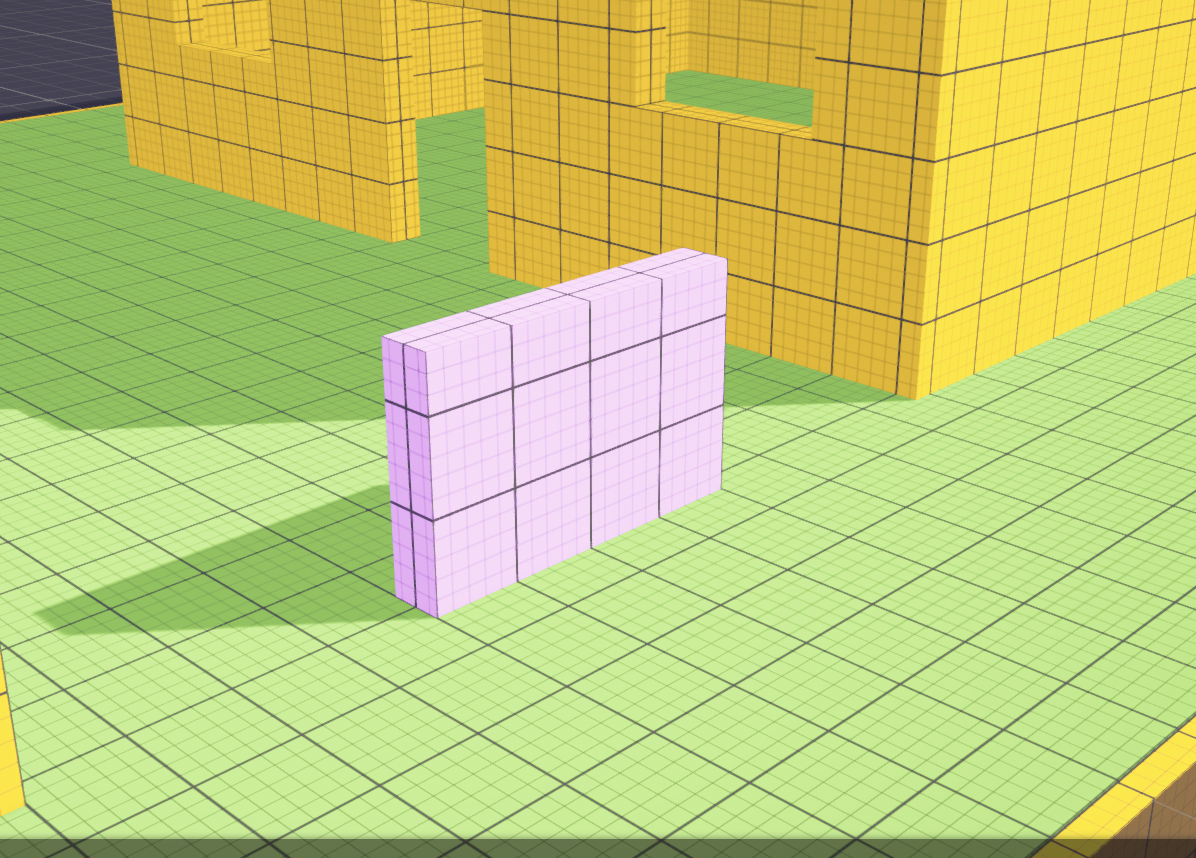
- Gizmos ON (Bottom Image) : The default editing state. Displays the full suite of interactive elements—including the purple handles, yellow wireframe outlines, and base projection lines. This mode is mandatory for active manipulation and metric verification.
- Gizmos OFF (Top Image) : Hides all wireframes, handles, and projection guides entirely. The selected block retains only its soft pink hue overlay. This allows designers to visually assess geometric continuity, textures, and unclouded sightlines without any UI clutter.
Mastering Cygon
Advanced workflows and techniques to design complete, multi-level environments with confidence.
Level design in Cygon
Instead of throwing a list of buttons at you, let’s build a multi-level environment from scratch. This guide follows the exact natural workflow of creating a map in Cygon, demonstrating how our tools seamlessly collaborate to manage layout, verticality, and structural links.
Laying the Groundwork (The Base Layout)
Every great level starts with a solid foundation. Your first goal is to map out the ground floor without fighting the camera or technical clutter.
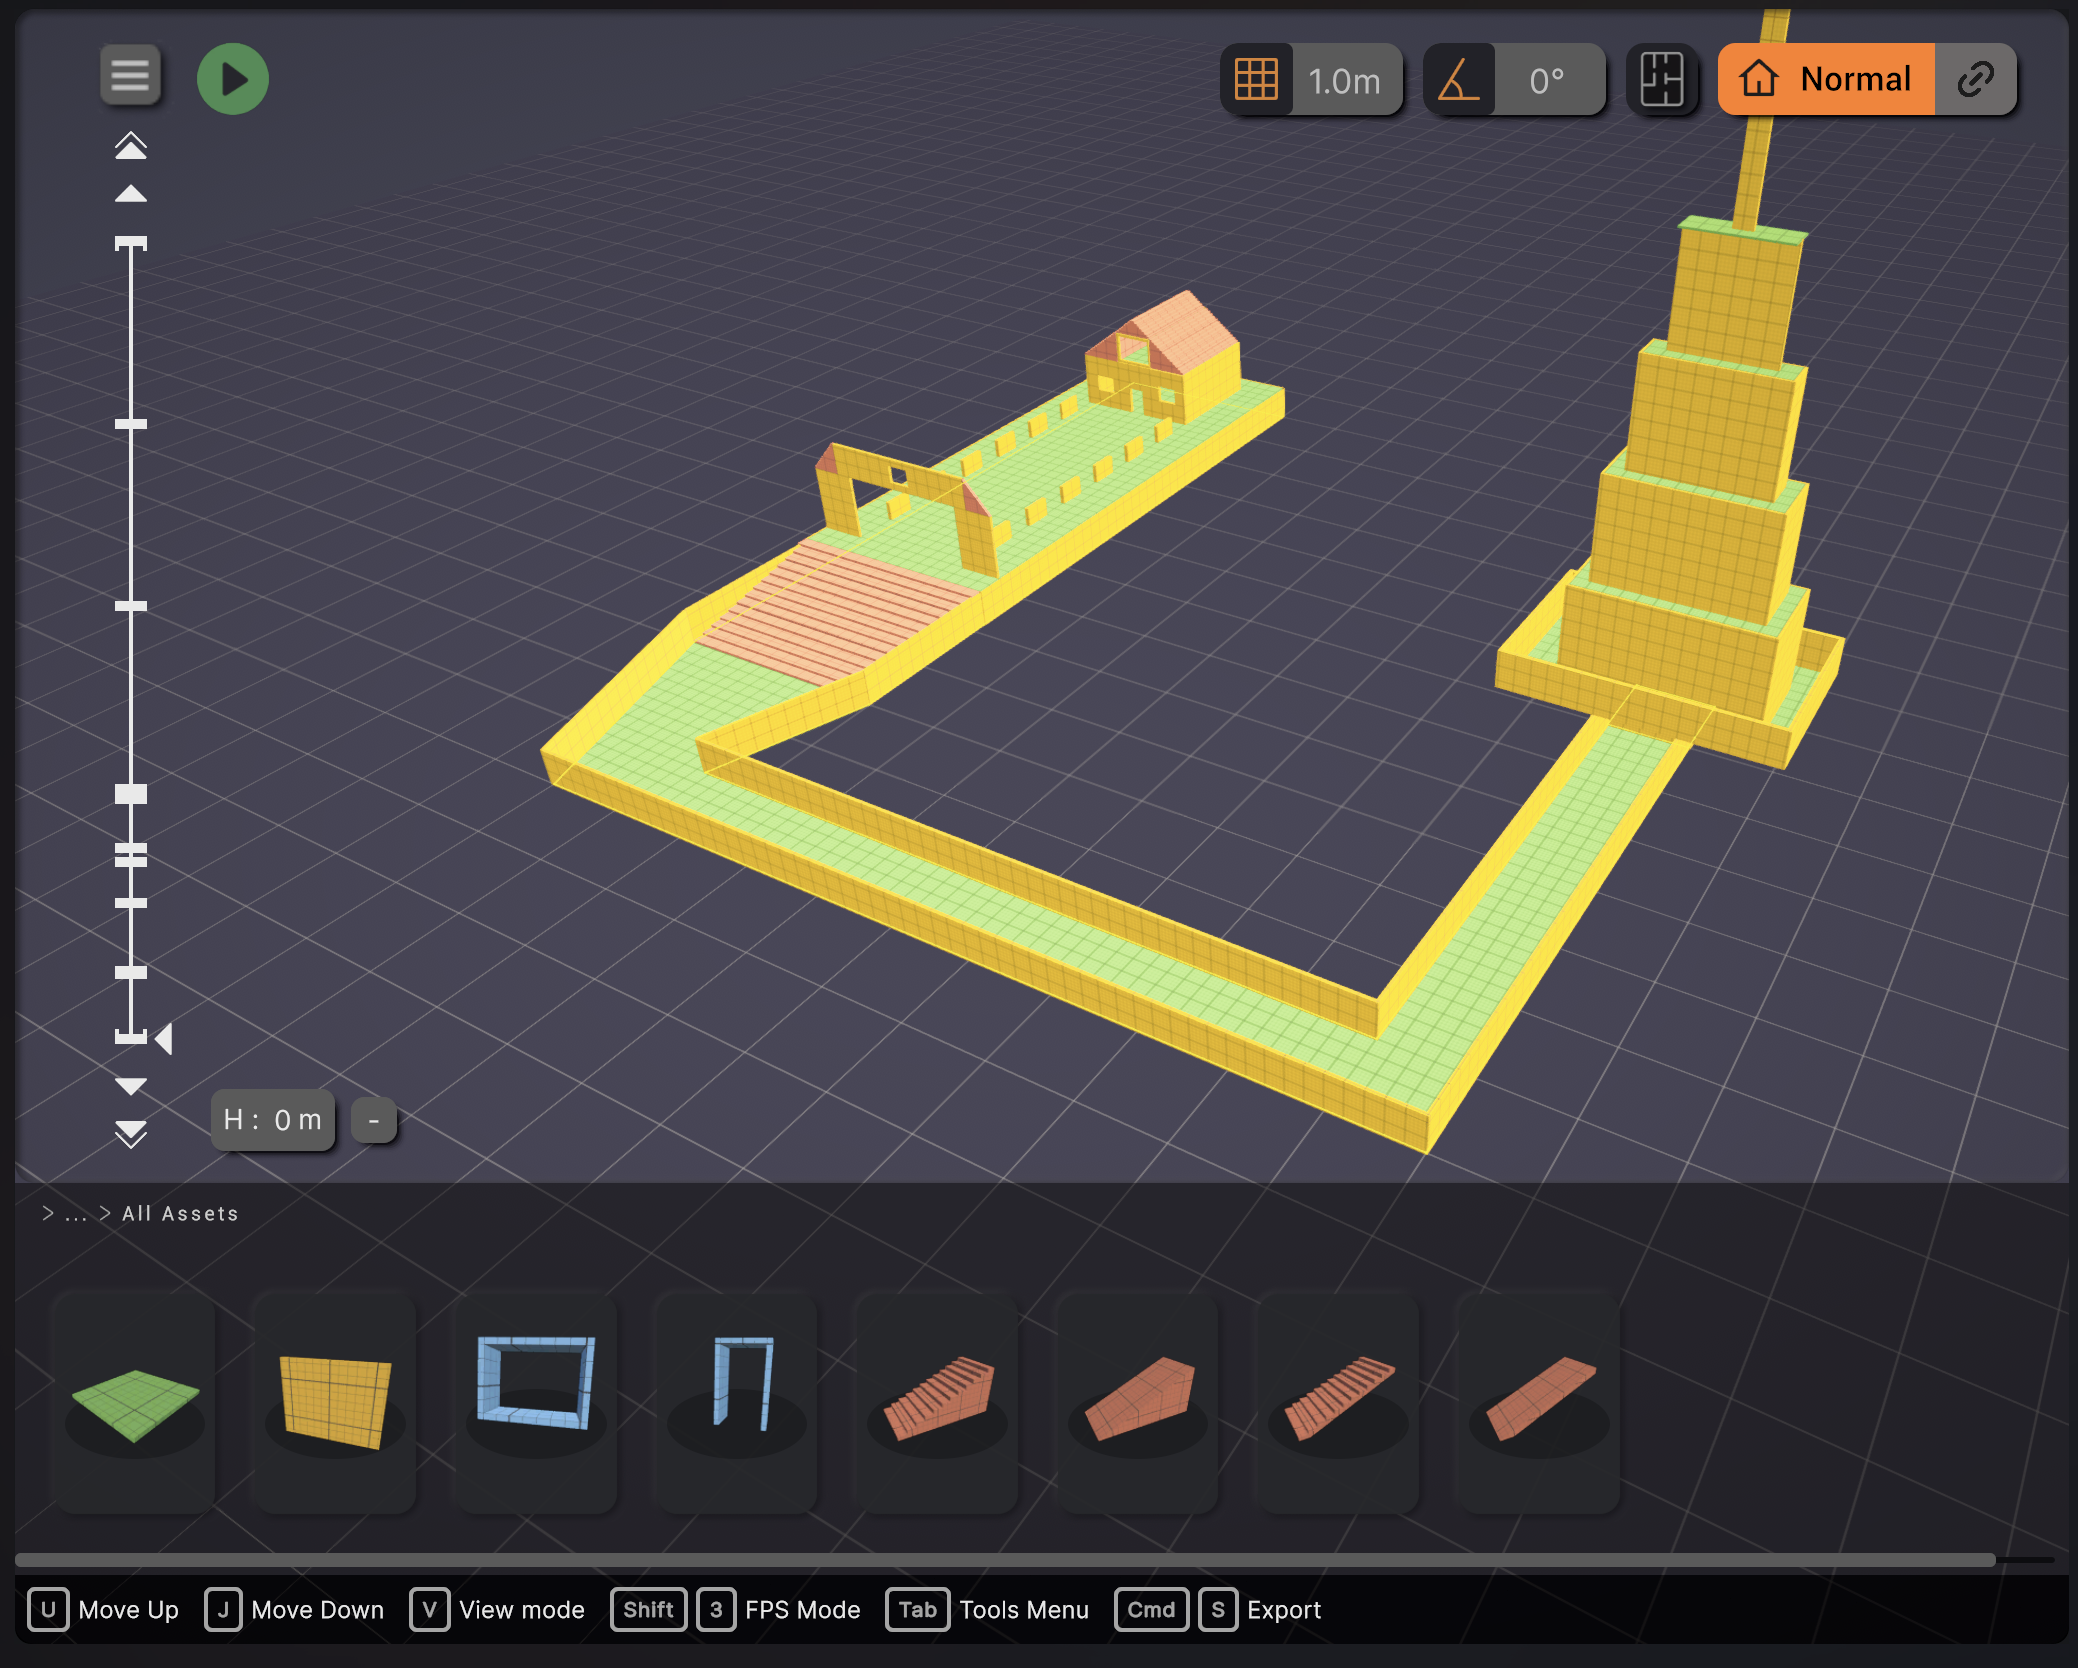
- Set Your Focus: Look at the central workspace header. Ensure the Overview Interface is toggled on (Green Active Status). This tracks your viewport to the local grid origin, keeping your camera anchored to your primary structural layer.
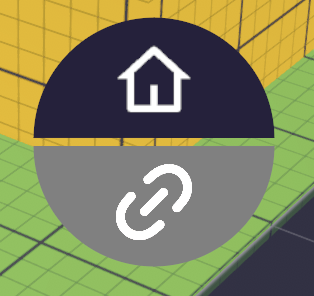
- Start the Blockout: Right-click anywhere in the viewport to open the contextual View Pie Menu right under your cursor. Select the Home Icon (Edition Mode).
- Placing Assets: You are now free to rapidly prototype, drop shapes, and build your base world. Cygon’s quaternary wheel allows you to select and rotate structural blocks instantly without ever moving your mouse to a distant sidebar menu.
Scaling Up (Adding Verticality)
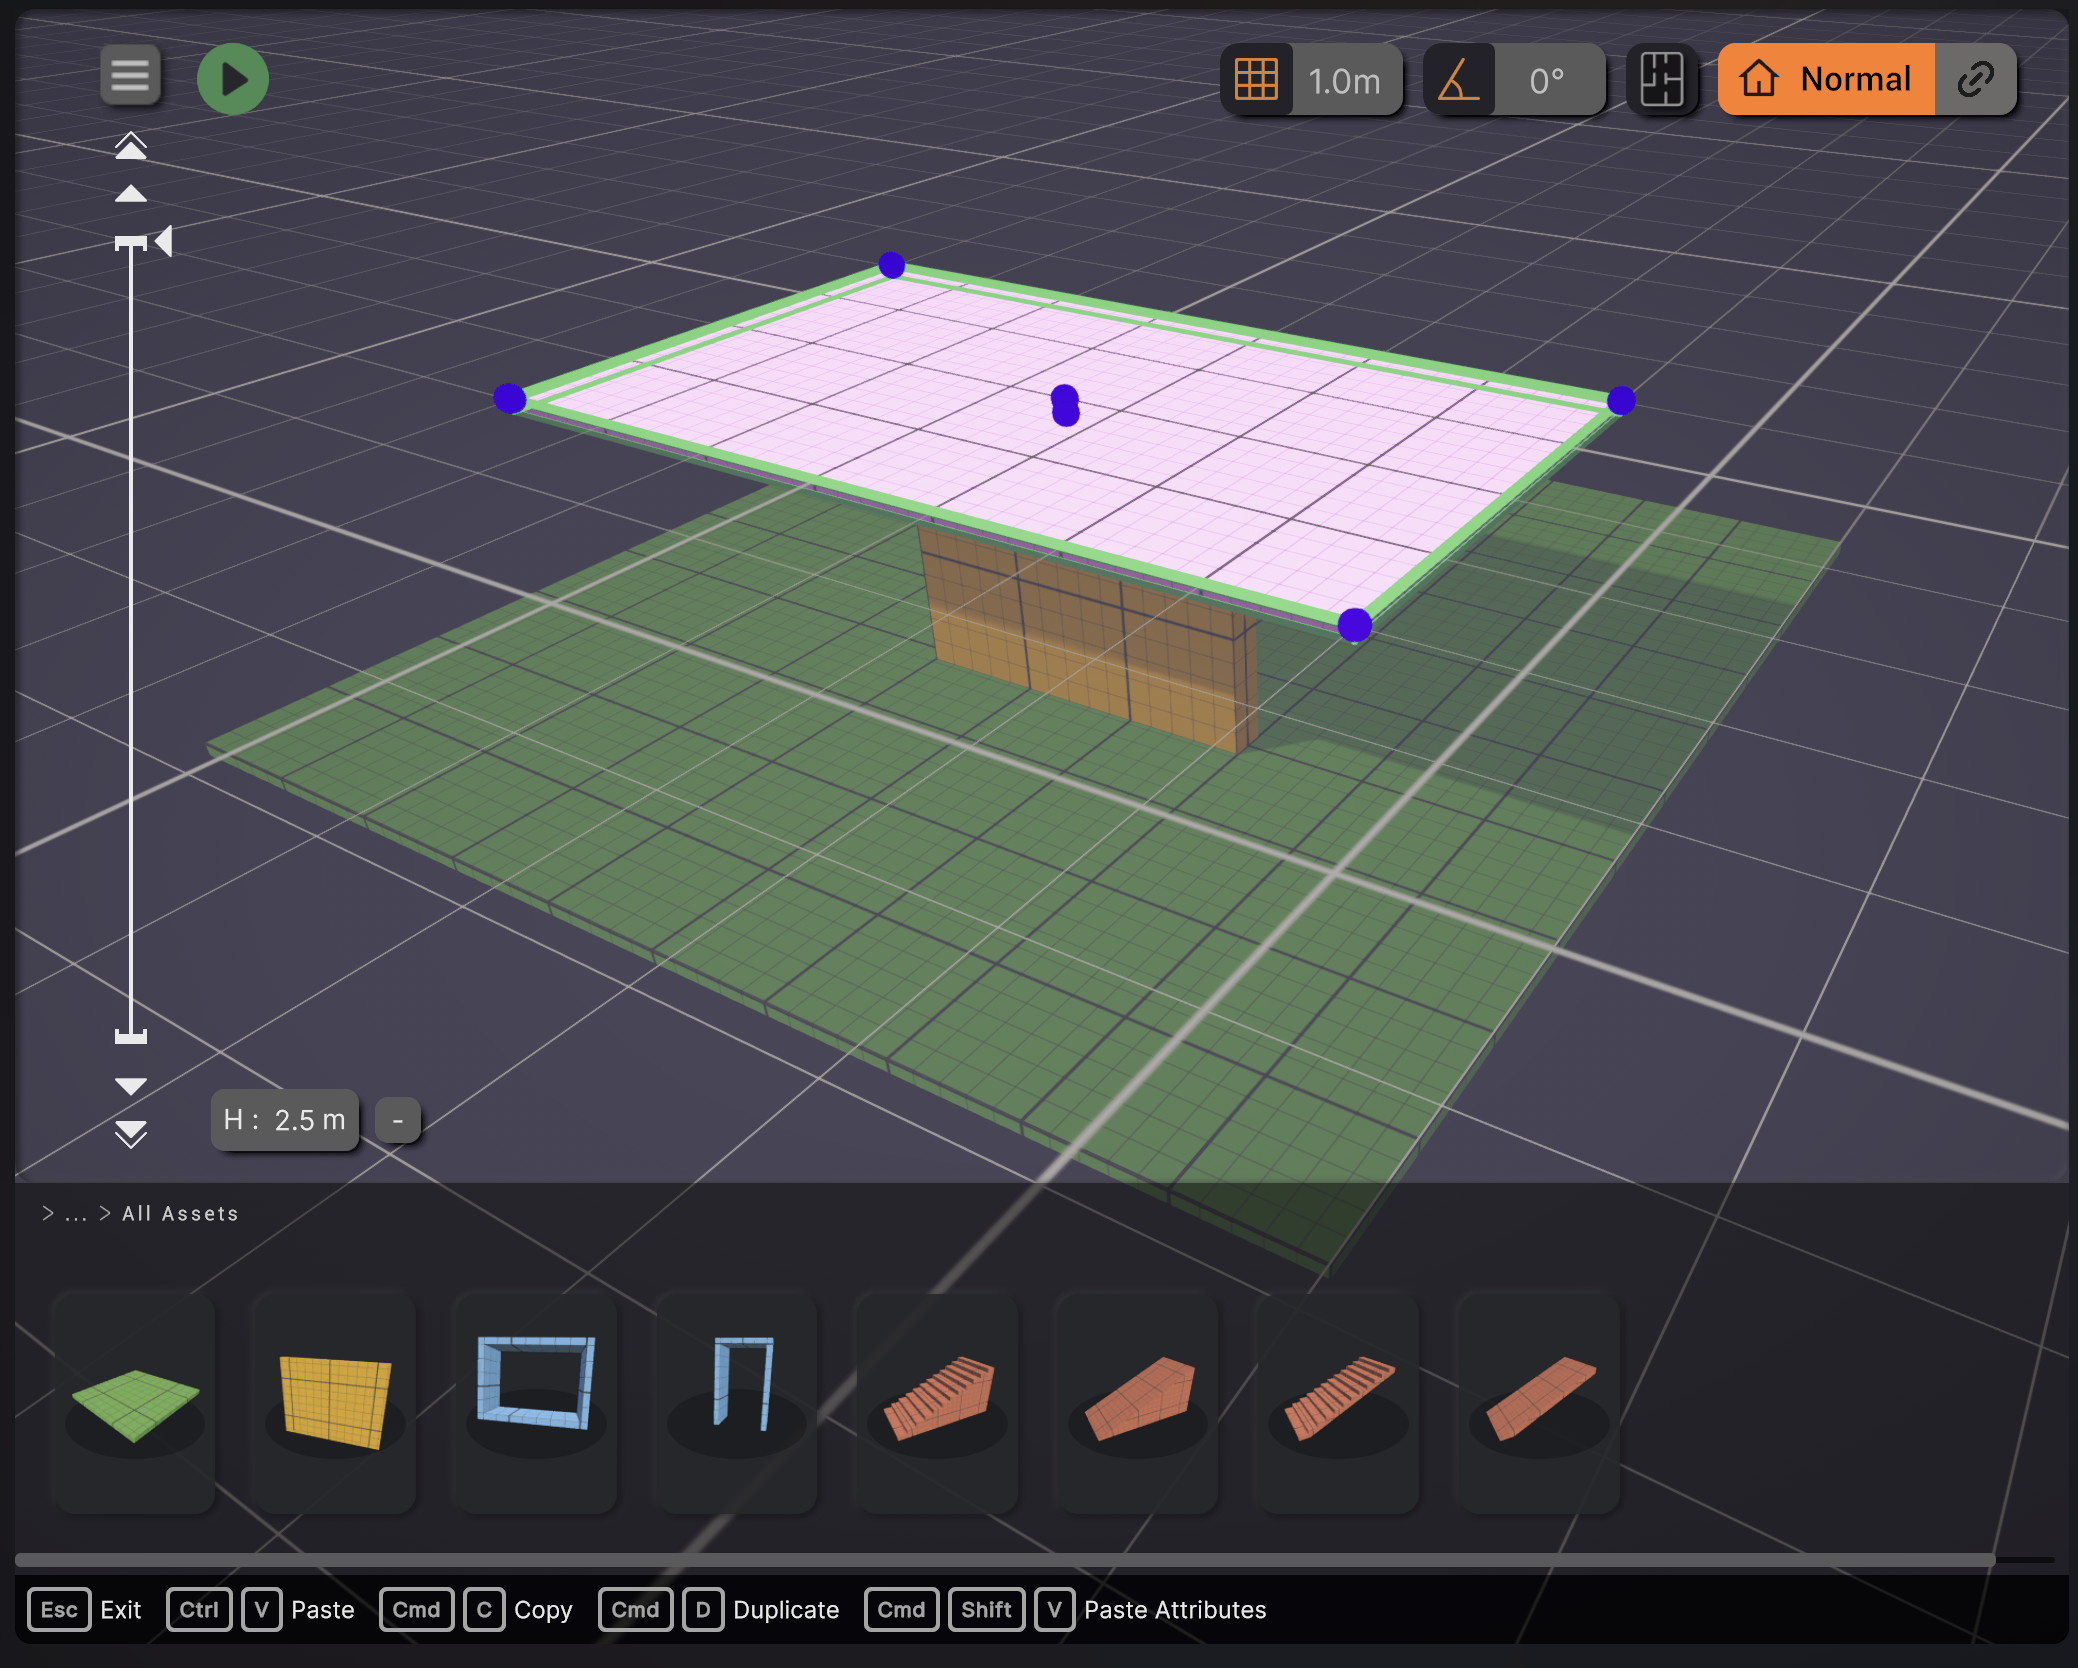
Now, let’s assume your ground floor is ready and you want to build a sniper balcony or a second floor. Instead of duplicating assets and guessing their height, you use the Height Manager.
- Sneak Peek Upper Levels: Use the smooth, fluid scroll bar on the side of your screen. Dragging this bar lets you look upwards and visualize higher floors independently without actually shifting your current active editing height.
- Switching Your Active Floor: Ready to build upstairs? Change your active floor level using your preferred method:
- Click directly on a floor layer in the Height Manager bar.
- Type the exact height value into the "H" input window.
- Use the keyboard shortcuts: U to go up, J to go down (or the arrow keys).
- Zero-Error Asset Placement: Once you are on the new floor, start placing your walls. The cursor automatically snaps every 10 cm, with an extra magnetic snap when you perfectly reach a floor level. No more overlapping geometry or floating assets.
Weaving Gameplay & Connectivity (The Link Editor)
A multi-layered map is nothing if players can't navigate it. Now that your second floor is up, you need to add angled walls, stairs, and custom covers, ensuring they perfectly align and snap with the floor below.
- Enter Connectivity Mode: Summon your View Pie Menu again and swipe to the Link Icon (Link Editor). Alternatively, toggle the Chain Link Icon directly in the central workspace header.
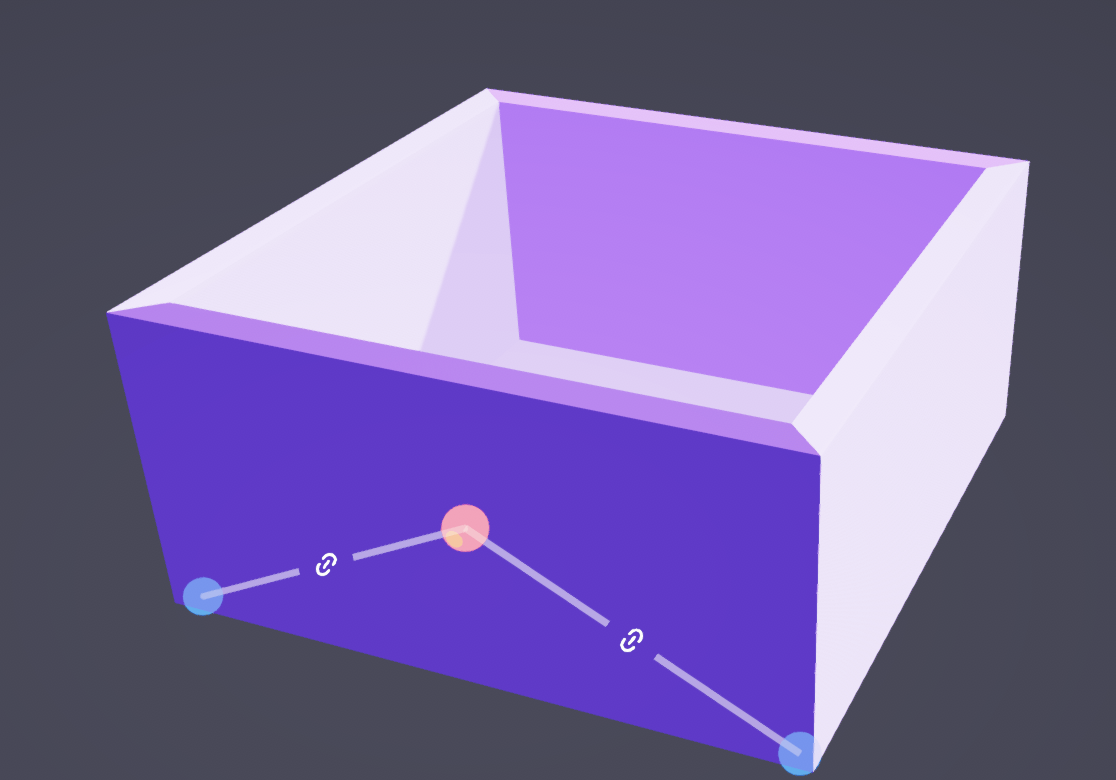
- Bridging the Layers: This mode activates block snapping connectivity across different level layers.
- Safe Tweaks: You can now modify complex choke points, move custom covers, or stretch angled walls. Cygon will dynamically preserve or edit the metric linkages between elements across layers without breaking your global geometry.
Sightline Validation & Polish
Your multi-level building is structurally sound. The final step is to check lines of sight—for instance, making sure a player standing on the ground floor can't exploit a broken angle to see into the sniper balcony.
- Distant Inspection: Scroll far away using the Height Manager to inspect the overall structural silhouette.
- Never Get Lost: If you wander too far off-screen, small Navigation Indicator dots will pop up at the top or bottom of your Height Manager bar, telling you exactly where your active editing floor is hiding.
- Instant Snapback: Don't waste time scrolling back. Click directly on the cursor indicator at those dots to trigger a Quick Return. The system instantly re-centers your viewport back to your active editing level so you can make immediate geometric adjustments.
Assets & World Building
Assemble your world and connect its pieces, from placing assets to mastering the linking system.
Link Editor Guide
The Link Editor is a dedicated mode designed to visualize and manage connections between 3D scene elements like walls, floors, and stairs, while keeping the interface clean and readable.
Activating the Mode
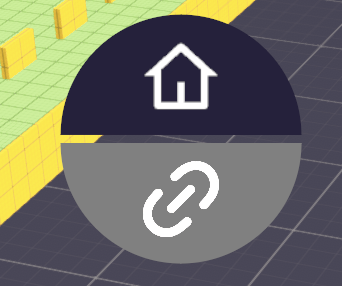
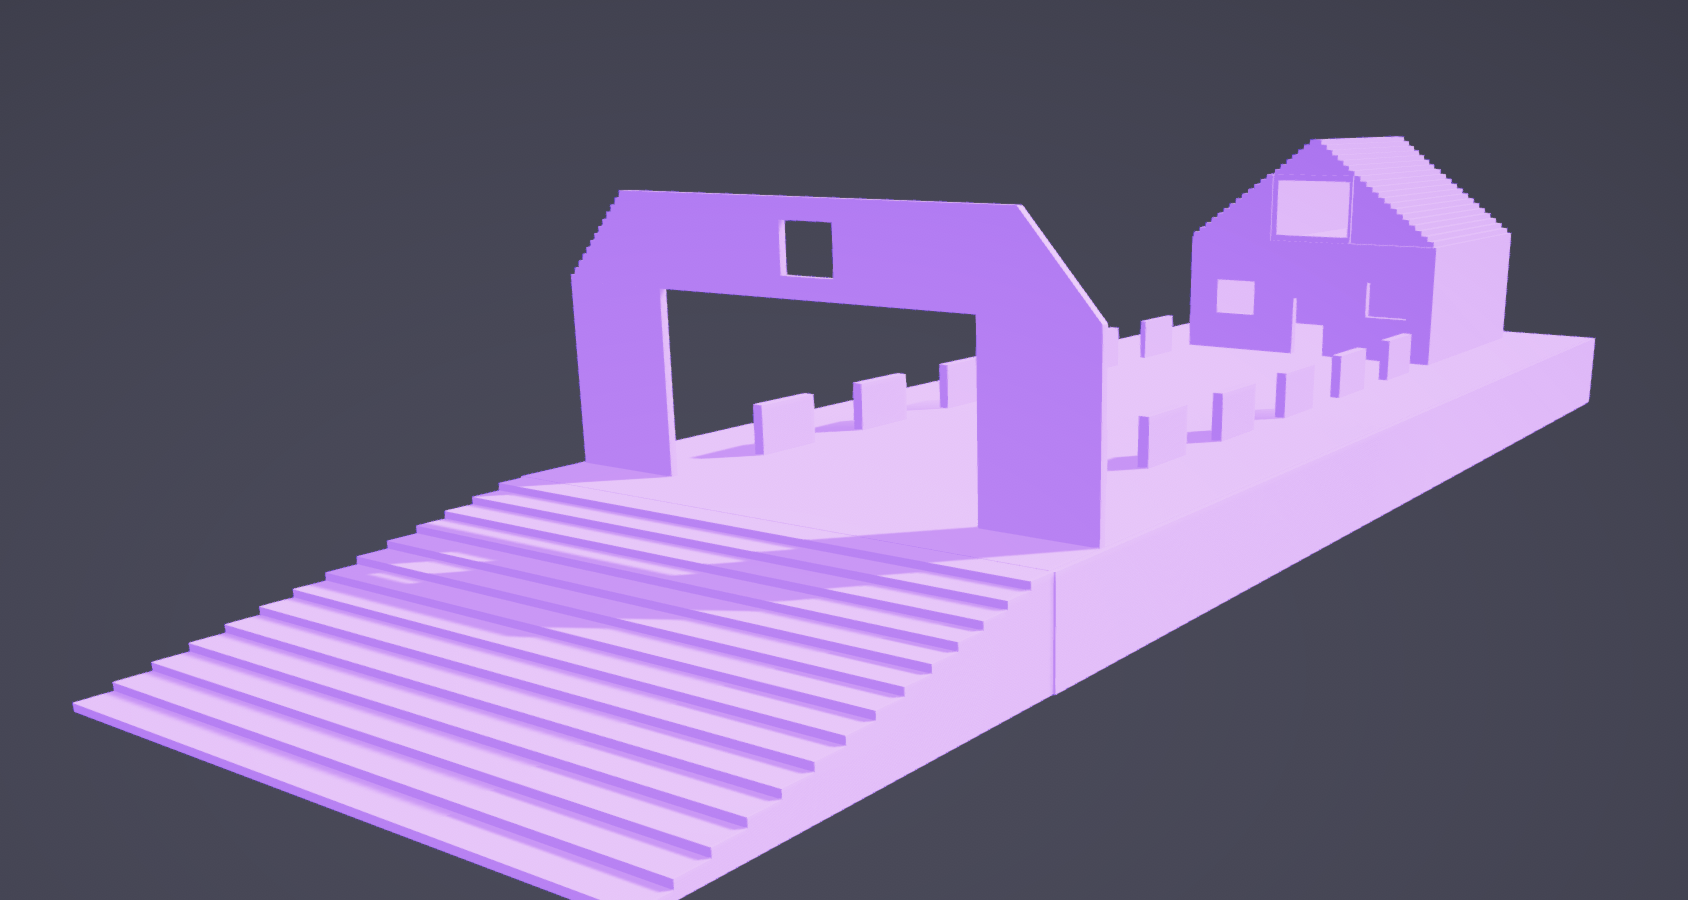
Once selected, the scene switches to a streamlined view:
- The floor grid is hidden.
- Transformation gizmos disappear.
Interaction & Hover
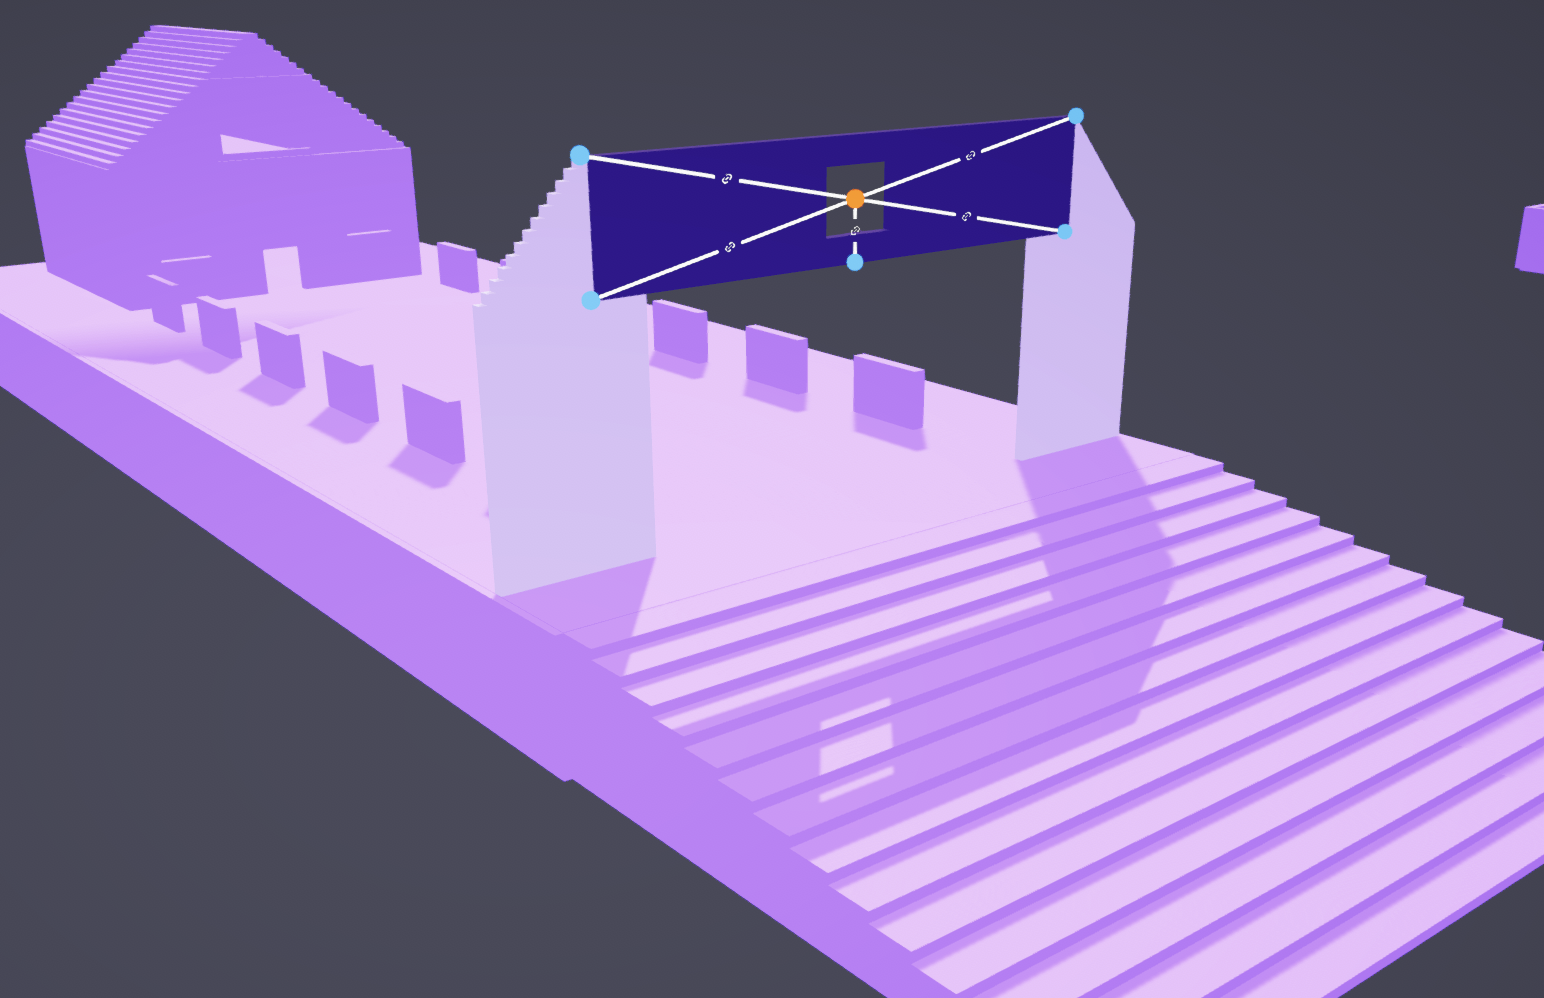
When you hover over an element:
- The center point appears with all existing links.
- All existing links from that point appear as lines leading to neighboring nodes.
- Neighbor Status: Adjacent nodes appear blue if a link already exists, or green if the element is eligible for a new connection.
- Everything fades away once the cursor moves off the element, unless a click was performed.
Editing Links
Clicking a node activates edit mode:
- Existing links become solid, animated dashed lines with full opacity.
- Eligible, non-linked elements appear semi-transparent blue with a "+" icon.
- Ineligible elements (too far) keep the default color.
Managing Connections:
- Create: Hover over a blue line until it snaps, becomes a solid line, and displays a "+". Click to confirm, and the line will turn green
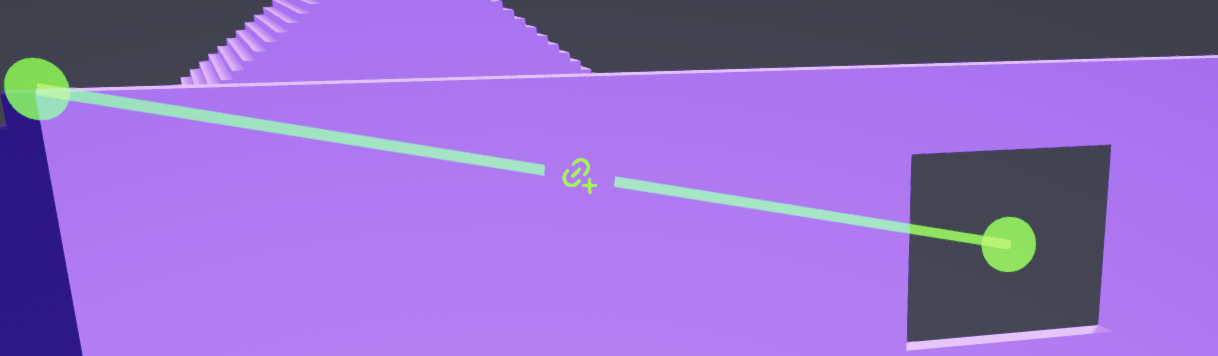
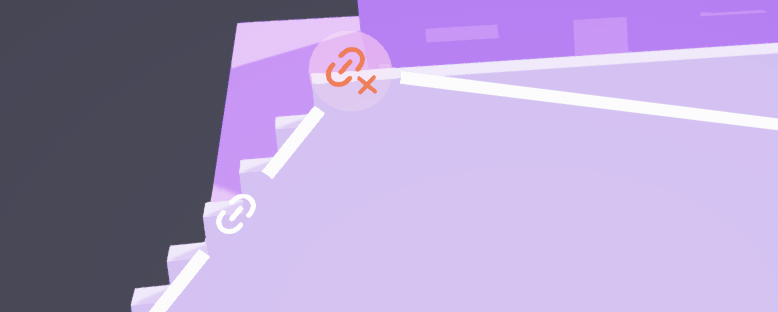
- Delete: Hover over a line or a node until it snaps and shows a delete icon. Click to remove it. The target node will revert to green. The delete icon only appears during snapping to keep the scene clean

Workflow and export
Connect Cygon to your existing pipeline and get your blockout into your engine.
Exporting to Unreal
The ultimate bridge between Cygon and Unreal Engine.
Seamless integration and live-sync for USDA files. Requirements.md Cygon Link is a powerful bridge that provides a robust pipeline for bringing USDA (Universal Scene Description) assets into Unreal Engine. It features a custom Factory for automated conversion. It also syncs changes from Cygon to Unreal Engine in real-time.
Key Features
- Automated Asset Generation: Converts USDA hierarchies, meshes, and materials directly into native Unreal Engine assets (Static Meshes, Materials, etc.) with collision support.
- Live Hot-Reloading / Reimport: Detects file changes in Cygon and instantly updates all instances in your active Unreal Engine level.
- Intelligent Mesh Processing: Uses Unreal Engine's native USD Importer under the hood while applying custom processing to ensure perfect results.
Getting Started
Installation via Fab (Pre-compiled)
The easiest way to get started is to get the pre-compiled plugin directly from Fab.
- Go to the Cygon Link page on Fab (soon).
- Add the plugin to your library and install it to your current Unreal Engine version.
- Open your Unreal Engine project, go to Edit > Plugins, search for Cygon Link, and check the box to enable it.
- Restart the editor if prompted.
(For general information on managing installed plugins, refer to the Epic Game Pugin Documentation.)
Installation via Git (Source Code)
If you prefer to compile the plugin yourself or need the latest development version:
- Navigate to your Unreal project's root folder.
- Ensure you have a
Pluginsfolder, or create one if it doesn't exist. - Open a terminal inside the
Pluginsfolder and clone the repository:
git clone https://github.com/inspyrstudio/CygonLinkForUnrealEngine
- Right-click your .uproject file and select Generate Visual Studio project files (or your preferred IDE equivalent).
- Open your project in Unreal Engine and click Yes when prompted to rebuild the missing modules, or build it directly from your IDE.
How to use it?
- Import your assets: In Cygon, export your level into the
Content/folder of your Unreal project (CTRL + S or the export button). As long as the editor is open, Cygon Link detects the new files and imports them automatically — no pop-up, and no editor preferences to enable. - Add to Level: Drag the imported asset from the Content Browser into your Level Viewport or Outliner.
- Live Editing Workflow: Keep your Unreal Engine project open. Open the source file in Cygon, modify geometry or transforms, and Export / Quick Export with CTRL + S.
- Switch back to Unreal Engine: Cygon Link detects the change and reimports automatically — your meshes update without any manual step.
Dependencies
This plugin has no third-party code or libraries. The only dependency is USDImporter, which is an Epic Games built-in Unreal Engine plugin (shipped with the engine itself).
Miscellaneous
- Requirements Unreal Engine Version: 5.8 or higher (Tested on recent UE5.7 versions). Ensure the USD Importer plugin is enabled in your Unreal project. Cygon Version: 0.2.3i or higher. (Note: versions prior to 0.2.3i do not support the proper export pipeline needed for engine integration).
- Contributing Contributions are welcome! Please feel free to tell us about anything that doesn't work with the package on the Discord.
Full documentation is available in the Docs/ folder
Exporting to Unity
How to export your environment from Cygon directly into a Unity scene via Cygon Link.
Exporting from Cygon to Unity
With Cygon Link installed in Unity, exporting your blockout takes one click. Cygon transfers geometry, materials, and layout data directly into your Unity scene.
Step-by-step
In Cygon, complete your blockout. Click File, then Export via Cygon Link. Select Unity as your target. Click Send. Open Unity. Your environment appears in the selected scene.
What transfers
Geometry, material assignments, collision volumes, trigger zone names, and group hierarchy all transfer cleanly. Lighting data is not exported as Unity handles final lighting in production.
Exporting to Godot
Transfer your validated blockout from Cygon into a Godot scene with no manual cleanup.
Exporting from Cygon to Godot
Cygon Link supports Godot export, transferring your blockout environment directly into a Godot scene. No manual import or file conversion required.
Step-by-step
In Cygon, complete your blockout. Click File, then Export via Cygon Link. Select Godot as your target. Click Send. Open Godot. Your environment appears as a new scene node.
What transfers
Geometry, materials, collision shapes, and group names all transfer. GDScript bindings are not included and should be added in Godot after import.
Exporting to OBJ
The alternative way to export your level from Cygon into most of 3D applications and game engines.
The alternative way to export your Cygon levels to any 3D software.
The OBJ export generates a standard Wavefront OBJ file that can be imported into most 3D applications and game engines, making it ideal for visualization or rendering.
Key Features
- Universal Format: Export your level as a standard OBJ file compatible with most 3D software.
- Lightweight Geometry: Preserve your level geometry with a clean mesh structure.
- Material Support: Automatically generates an accompanying MTL file and texture references when applicable.
- Wide Compatibility: Import your exported files into software such as Blender, Roblox Studio, Maya, 3ds Max, Cinema 4D, and many others.
Getting Started
Exporting to OBJ is straightforward:
- Open your project in Cygon.
- Go to the Project Manager window.
- Choose the destination folder.
- Select Roblox or other targeted engine.
- Click Export.
- Cygon generates the OBJ file along with its associated MTL file and any required textures.
How to use it?
After exporting:
- Open your preferred 3D software or game engine.
- Import the generated
.objfile using the application's standard import function. - Ensure the
.mtlfile remains in the same folder as the OBJ file so that materials can be loaded correctly. - If textures were exported, keep them alongside the OBJ and MTL files to preserve the material appearance.
Your level is now ready for visualise, rendering, or integration into your own workflow.
Exported Files
A standard OBJ export typically contains:
YourLevel.obj– the mesh geometry.YourLevel.mtl– material definitions.- Texture files (if applicable).
Keep these files together when moving or sharing your project.
Compatibility
The OBJ format is supported by nearly every major 3D application and game engine, making it an excellent choice for exchanging assets between different tools.
Miscellaneous
Known Limitations
- OBJ stores static geometry only.
- Scene hierarchy, procedural data, and Cygon-specific information are not preserved in the exported file.
- Some advanced material features may differ depending on the capabilities of the target application.
Troubleshooting & Support
Answers to the most common questions, plus the channels to reach the team and community when you get stuck.
Communities & Feedback
Learn how to submit feedback, report bugs, and collaborate with the Inspyr Studio team to shape the future of Cygon.
Using Discord to collect your feedback has been super helpful.
But to better organize, prioritize and keep you updated on progress, we're taking it to the next level!
We've set up Featurebase, our official feedback portal :
You can now:
- Report a bug in detail
- Suggest a new feature
- Submit an improvement idea
- Vote on other users ideas
- Track the progress of your suggestions in real time
We've put together a quick guide (see attached file) to help you get started in just a few minutes.
Your feedback directly shapes our roadmap — every vote and every post makes a difference. Thank you for your continued support.
Frequently Ask Question
How can I report a bug or suggest a feature?
We're constantly improving Cygon based on community feedback. You can report bugs, suggest features, and track updates on our dedicated platform
How can I contact the team or get support?
Reach us via the contact page, or by emailing the support team directly We read everything.
Can I export my projects to Unity, Unreal or Godot?
Yes. Through Cygon Link, you can export your projects to Godot, Unity, and Unreal Engine in one click.
Can I use Cygon for different types of projects?
Yes. Cygon works across game environments, level design, VR, animation, and film set design. The core tool is the same, only the workflow changes.
How long does it take to install Cygon?
Under five minutes. Download the installer for your platform, run it, and Cygon is ready to launch. No complex dependencies.
Which operating systems does Cygon support?
Cygon runs natively on Windows and macOS. Linux isn't supported yet.
Do I need coding or 3D experience to use Cygon?
No. Cygon is a visual tool. If you can sketch a floor plan, you can build an environment. No scripting, no UV mapping, no prior 3D experience required.
Do I need to follow tutorials before I can start?
No tutorials required. Open the app, start placing volumes, and build your first environment. Most users complete their first blockout in under 30 minutes.
Start building your next environment today
No credit card. No time limit. Your first blockout is 30 minutes away.